Adding the Pullrite Hitch
July 2013
|
.jpg)
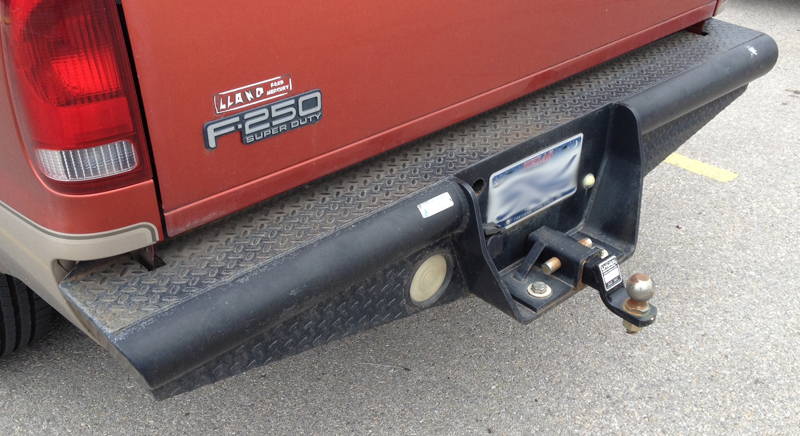
my original Ranch Hand back bumper
|
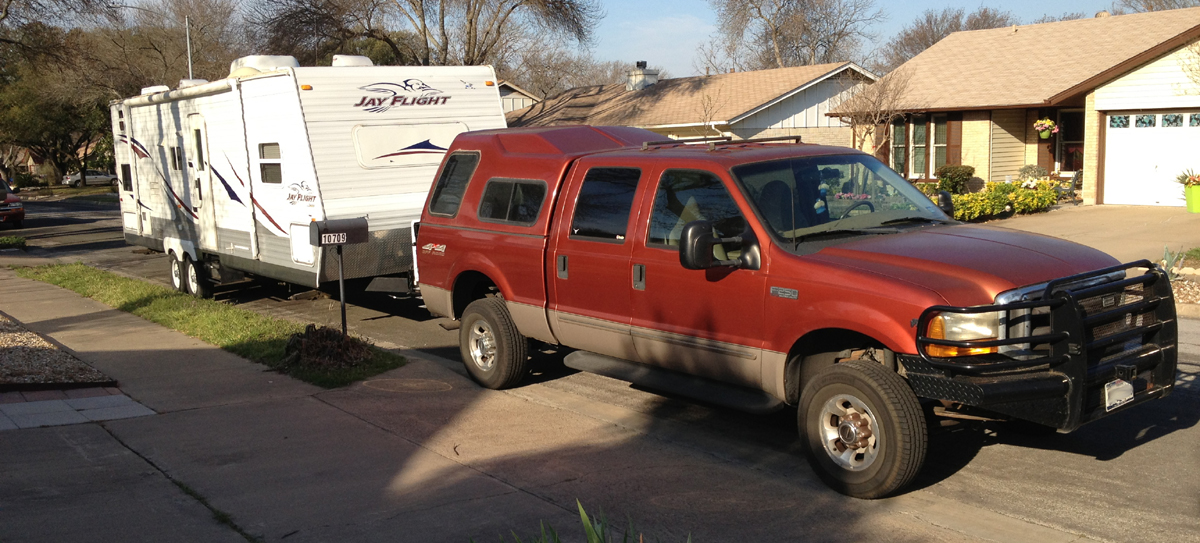
Some good friends of ours, Jack and Janelle, have pulled a trailer up to Alaska for many years. When we started talking about wanting to travel with a trailer, Jack insisted that we look into buying a Pullrite Hitch. Jack assured us, through countless hours of research and his own experience, that the Pullrite hitch was the safest way to pull a trailer. Fast forward a bit and a few years ago at the RVIA trade show in Louisville Kentucky, I was fortunate to meet Andrew Pulliam, the owner and founder of Pullrite hitches.
|
|
I told Mr. Pulliam about our plans and he gave me his personal mobile number and told me to call him when I was ready to buy. The day came in 2013 and I gave him a call. Not only did he remember me but he helped me with the price tag a bit. The hitch was built specifically for my make, year, and model truck. It arrived on a pallet and was marked as weighing 300 lbs. The install was done by Texas Hitch & Truck Center on 9099 Research Blvd, Austin, Texas 78758 (ask for Nick). The hitch can pull 20,000 lbs or 10 tons and has a rated tongue weight of 2,000 lbs or 1 ton.
|
.jpg)
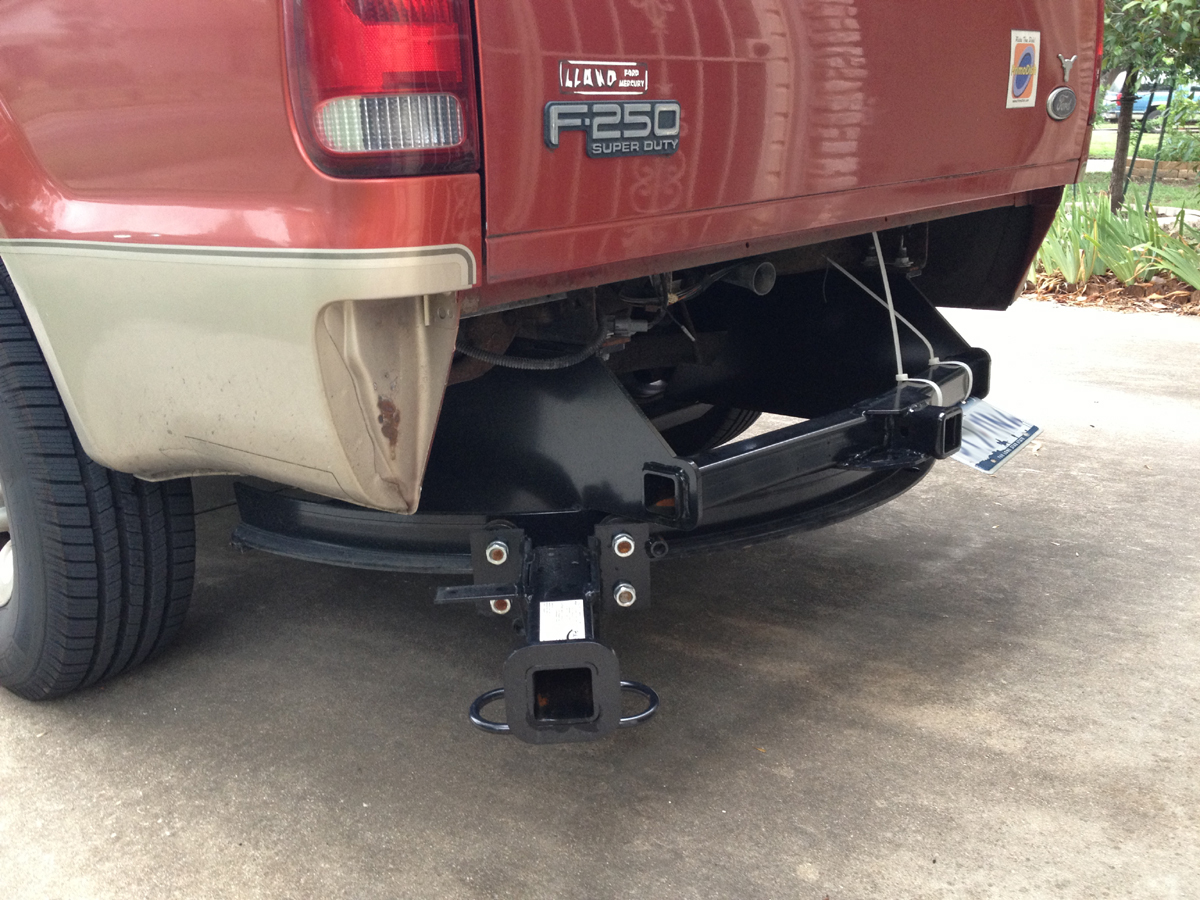
new Pullrite Hitch and no more bumper
-- note zip ties --
|
|
The Hitch is a beast. The whole hitch pivots around 180 degrees and gives you the feel of driving a fifth wheel. As far as sway goes, there is NONE at all. The dreaded bow waves, either hit from head on or hit from behind while being passed, have little to no effect on the truck of trailer. I would recommend the Pullrite hitch to anyone wanting the safest way to pull a trailer. Unlike some other sway control hitches, you can hitch and re-hitch the trailer at almost any angle so long as you can square the receivers. This means that I have gotten into some tight parking spots and then later realigned the truck to pull out at a much easier angle. My only caution would be that because the hitch approximates the towing profile of a fifth wheel, your bumper pulled trailer will be less responsive to turning while backing. It has taken me quite a while to get used to it and sometimes it is still downright frustrating trying to get her backed into what should be any easy spot. I would gladly sacrifice ease while parking for better road safety any day though. Want to talk more about this hitch, I'm happy to answer any questions you might have or give tips on use.
One side effect experienced was that my old Ranch Hand back bumper, with its 12 inch drop, would no longer fit properly with the pivoting receiver. So I had to put it up on Craigslist...
Because I had no bumper, I didn't have my license plate attached to the back of my truck anywhere. I had been driving around like this for a few days and was aware that I would probably be in trouble if stopped. Well, late one night, I did get stopped by APD while driving down Burnet. I was certain the officer was going to ticket me but instead we talked about the hitch a bit and then he grabbed some zip tie hand cuff restraints from his trunk and helped me secure my license plate. I didn't catch his name but I was greatly appreciative. Thanks APD!
|
|
The Lift Gate!
September-October 2013
|
|
So I put my old Ranch Hand back bumper up on Craigslist just hoping to sell it for cash enough to pay for half the cost of a new Ranch Hand bumper. I didn't get much interest at all for a while. Finally I was contacted by a guy that said he would buy my bumper for the cash I was asking or he would trade me an old used Tommy Gate lift gate. The lift gate would take care of my bumper issue and give me a LIFT GATE. After making sure that the lift gate and Pullrite would play nice, the deal was a go. I had Pickup Heaven, located at 9600 N Interstate 35 Frontage Road, Austin, Texas 78753, do the install. This was purely to check fitting and make sure that the gate was in good working order. All seemed in good shape except for the fact that the gate was pretty well rusted.
.jpg)
|
|
I started asking around to find someone to sandblast and repaint the lift gate. A friend mentioned one place and when I called, they refereed me Alpha Painting at 904 Tradesmens Park Loop, in Hutto, Texas 78634. I called and left a message. Then I went online to see if they had any web presence at all. I found a website that was almost completely broken and barely functional. I emailed Alpha with a proposal. I would completely overhaul their back end code to fix all the problems and get them more streamlined for Google search engine optimization and in return they would sand blast and then paint my gate. I got a call the next day that they had been meeting just that day to discuss how to fix the website. My email was waiting in their inbox when they left the meeting. After a face to face we were all set to go. In good faith, I built out the website and demonstrated it.
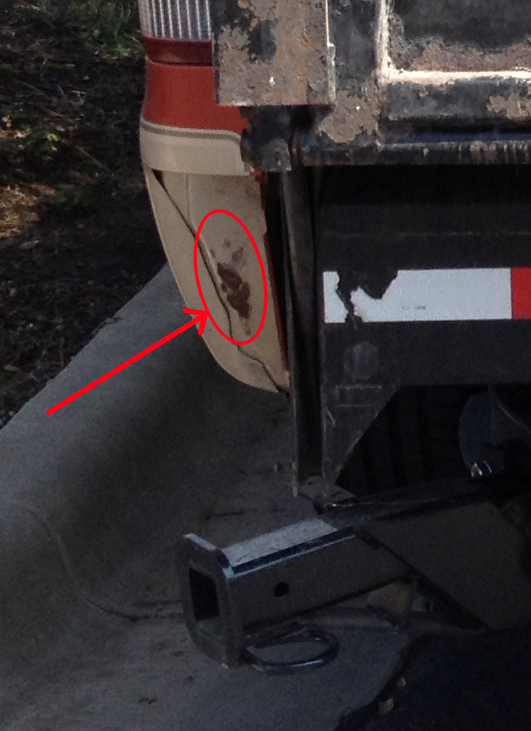
Building out Alpha's website took me several weeks, working it in as I had time, and in this time I started kicking around the idea of giving the gate some upgrades. I really didn't like the way that the gate left bare spots exposed on either side where the truck bed's side panels would have been covered by the bumper. Over the years, these spots had become worn and rusted from abrasion by the bumper. While the gate was being refinished, additional metal could be welded on and painted such that it would all look professional. I finally settled on the idea of making three fins that would hug my truck's contours and fill in the space. I mocked up the fins in cardboard, just taped to the truck, then modeled in 2D in Corel Draw. I then had a good friend (thanks Ron!) cut the fins out of cardboard using a laser cutter. My first round was a bit off and needed some adjustment. I edited my design and was ready to get the parts water jetted into 0.25" plate steel.
.jpg) |
.jpg) |
.jpg) |
.jpg) |
| rusted |
mock up |
mock up |
2D design |
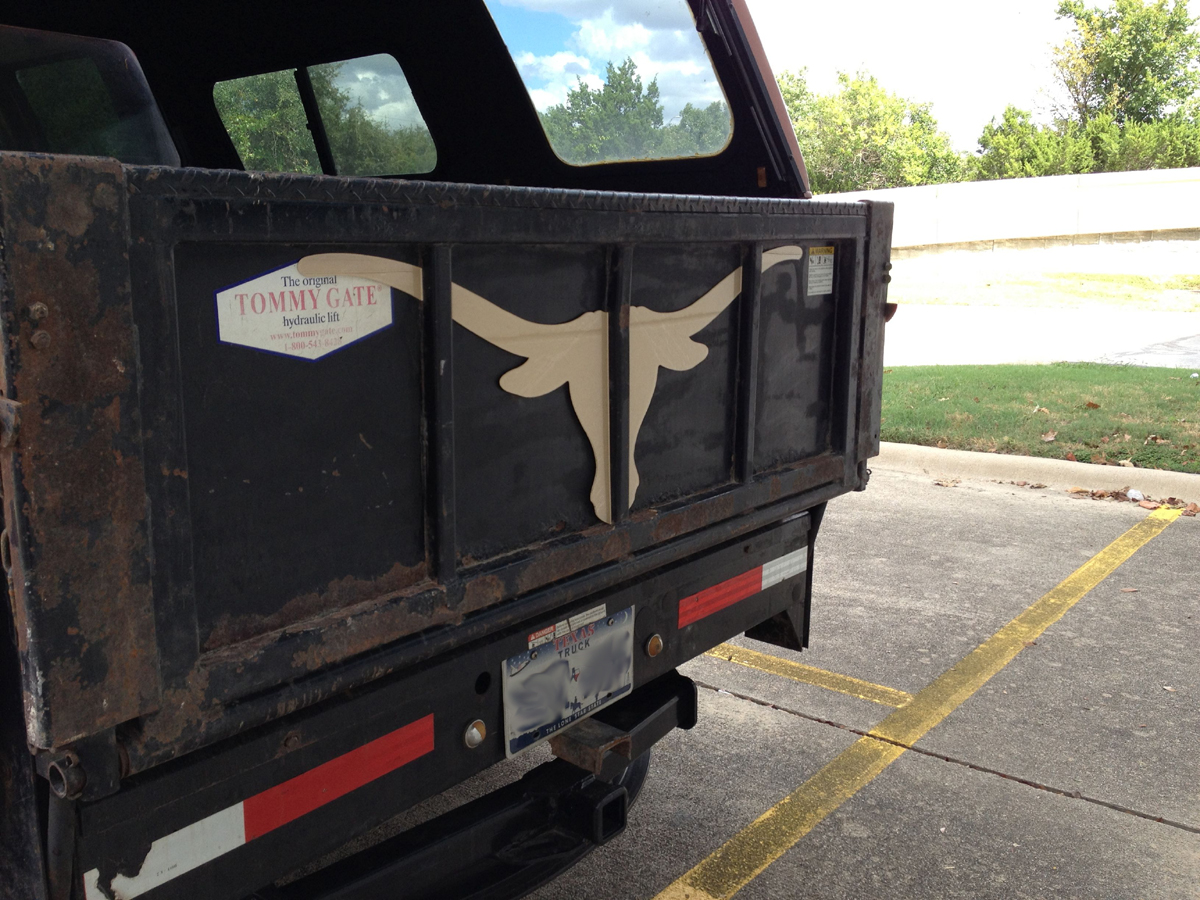
As long as I was going to be welding anything on the gate, why not go ahead and weld on a 3 foot set of Longhorns to go across the back? I mean, this truck was used when I was in the Cowboys to pull Smokey, the canon for the University of Texas at Austin. Why not make her feel special? I designed the longhorn to be cut in four pieces and then welded into the recessed areas of the gate. The idea was to make it big but then paint it black with the rest of the gate so the size is a bit muted by the color. I figured anything too obnoxious would just make it a target for vandalism. Again, my pattern was cut into cardboard (thanks Ron!) but this time the first pass was good and ready for water jetting into 0.25" plate steel.
.jpg) |
.jpg) |
| 2D design ready for cutting |
longhorn mock up |
Alpha gave me their hosting credentials and I uploaded their new code. I then sanded, primed, and painted my bumper wells on the back of the truck to arrest the rust development and make it all look better. A few days later, I dropped of the truck with all the extra parts. Alpha was easily able to sand blast, weld on the new parts, paint the lift gate, and then even reinstall it back on my truck. The paint they used is exceedingly tough and has already stood up very well to some pretty harsh abuse. I absolutely love the way everything turned out and am greatly appreciative to both the guy that traded me for the gate and Alpha for breathing new life into it.
.jpg)
|
|
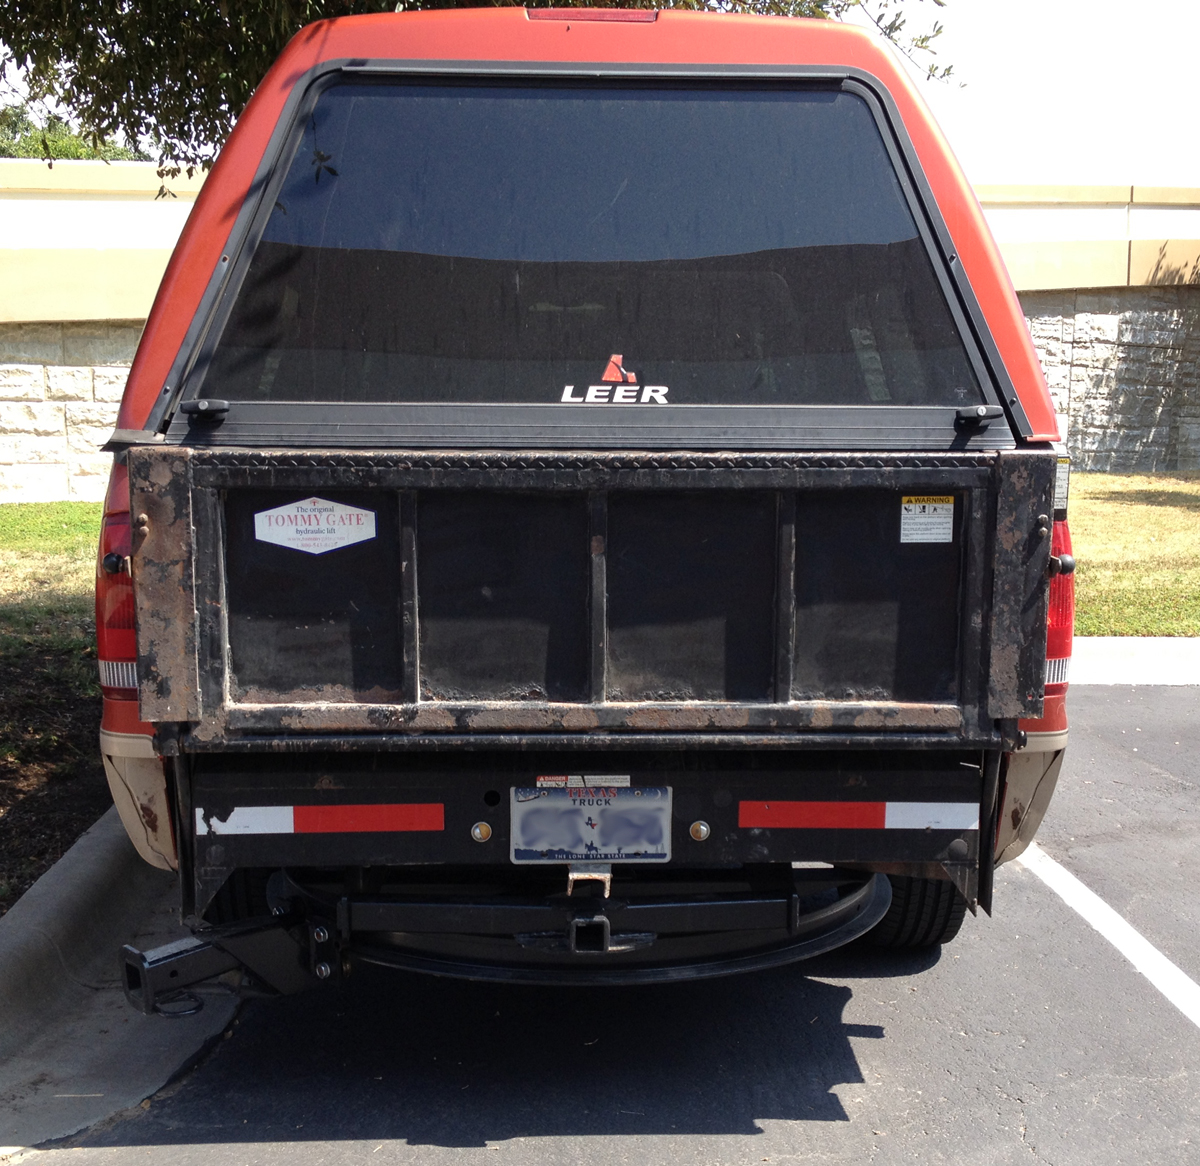
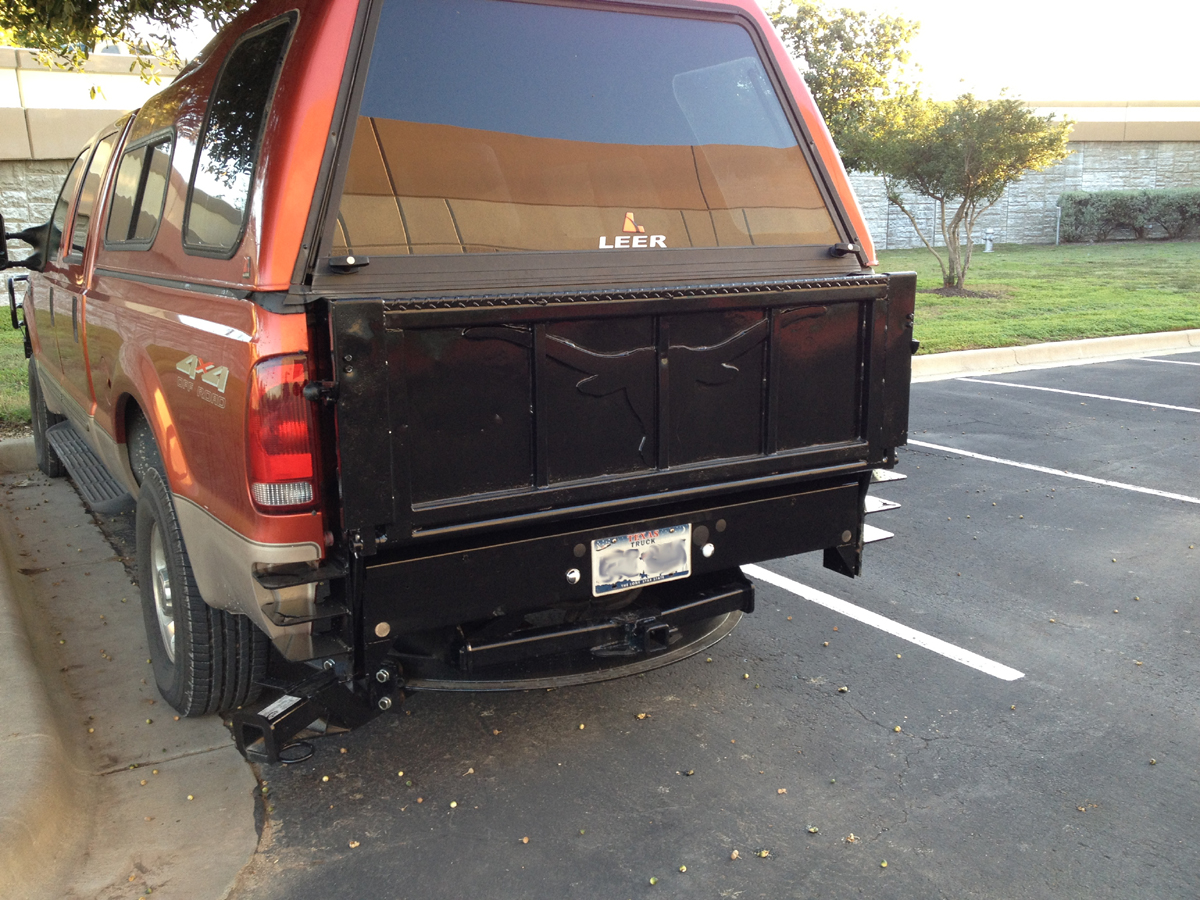
The only problem still to be addressed was the fact that the lift gate sticks out about six inches further than the original tail gate. This means that my Leer Camper Shell door does not make contact with the lift gate and therefore leaves a 6 x 60 inch gap where rain and dirt can easily get into the back of the truck. Also, it would be hard to secure my cargo against theft with such a large open gap. My idea is to weld a flap that is hinged to the lift gate that would flap over and close this area in. It will be a while before this matter gets addressed.
|
|
What happened to the truck's heads?
February 2014
|
.jpg)
my engine sans heads
|
Turns out that in Ford's infinite wisdom they built their Triton class engines with aluminum heads and decided that of the 15 or so threads on a spark plug, only three would be needed. Soooo, after about 200,000 miles, guess what happens. The spark plugs start shooting out of the engine. Yep, I had two go this way with the latter actually leaving a hole into the cylinder where the coil was blasted out. After pulling the ignition and fuel line on that cylinder, I was able to limp home and get her into a shop the next day. I got some great looks driving my truck to the shop while compressed air was being rapidly decompressed in the empty cylinder.
|
|
It sounded like a machine gun driving past. I had two plugs (of 10) patched before having the heads completely removed and remanufactured by Century Motors down on 5220 Jim Hog Avenue in Austin, Texas 78756. Travis Seggler and his dad, Joe Seggler, are the BEST. These guys take care of your problem until it is fixed. Prior to the engine work, Century also replaced my brakes and rotors. After the new heads and on a separate occasion, they installed new shocks and repaired the busted clutch on my AC. Prices were more than fair and their work ethic is first class. You guys have earned my business for life! For anyone interested, their telephone number is (512) 467-1255.
|
|
Airbags and Brake Controller
February 2014
|
|
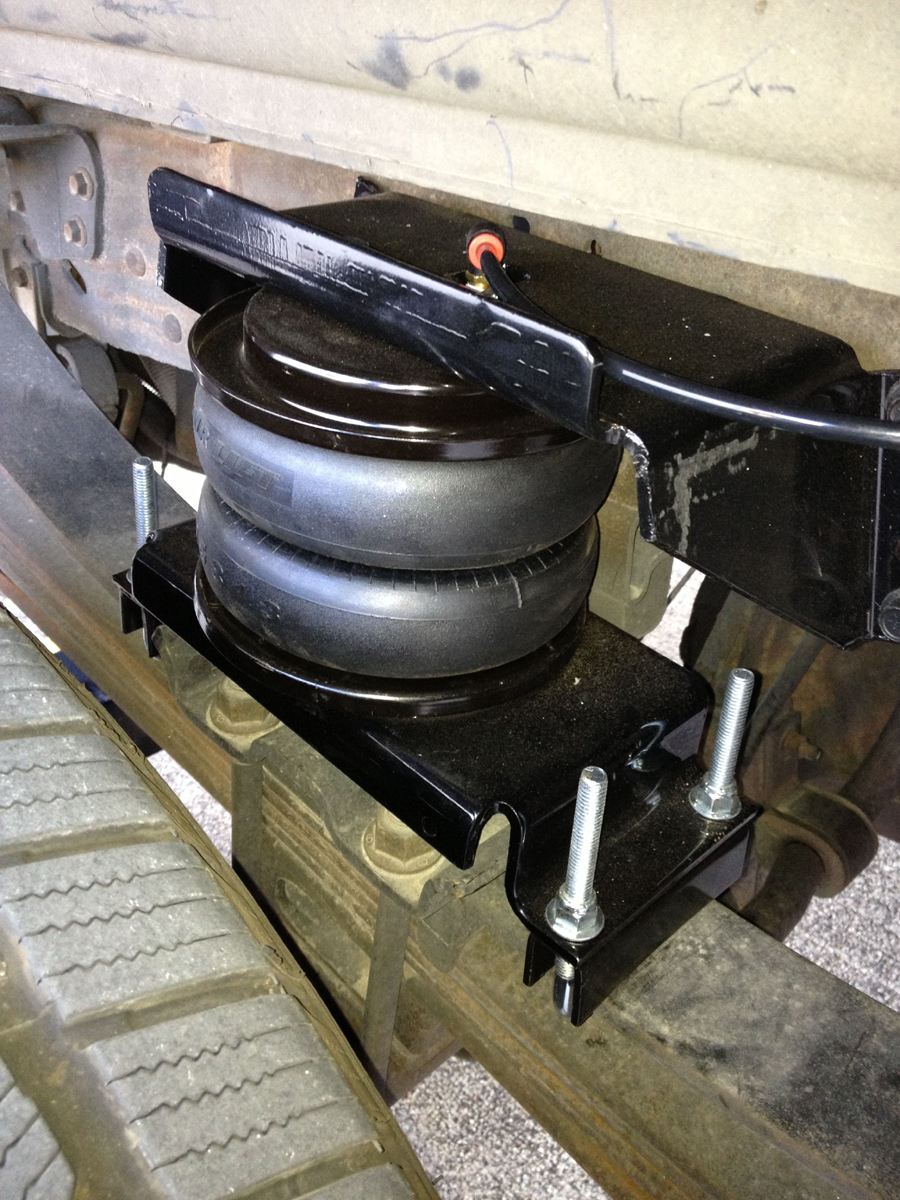
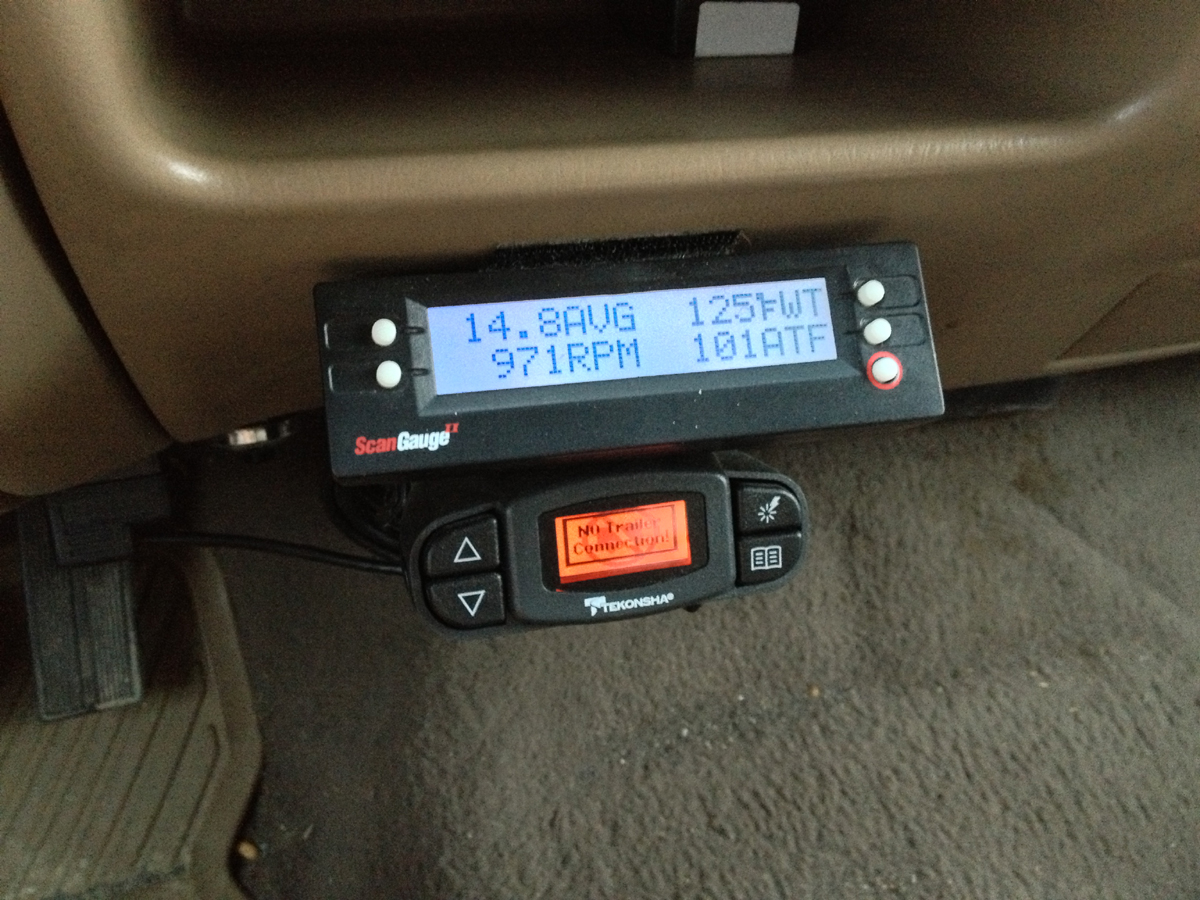
In the past, I had noticed that the back end of my truck would sag pretty noticeably if saddled with a heavy tongue weight. After some research, it turns out that this imbalance in the truck can actually cause you serious trouble on inclines. In the name of safety, I decided it best to install leveling air bags to make sure that my truck always maintained proper balance when towing and otherwise. Amazon.com had a great deal on Air Lift brand adjustable air bags so I made my purchase. When they arrived, I took the parts over to Texas Hitch & Truck Center on 9099 Research Blvd, Austin, Texas 78758 (ask for Nick). I also had them install a Tekonsha Brake Controller. Now, with the Pullrite Hitch, leveling air bags, and a brake controller, the truck was finally ready to tow safely.
|
.jpg)
air bags installed on rear tires
|
.jpg)
brake controller installed in cab
|
|
Our Trailer
February-March 2014
|
|
The plan for many years was to buy a vintage Airstream and have it professionally renovated. We did start down this path which in time turned into an incredible source of stress and waste of money and effort. In early spring of 2014, we were forced into cutting our losses and started the painful process of moving in a different direction. Per a friend's recommendation (thanks Jack!) I purchased the RV Consumer Group's RV Ratings Guide, which I would highly recommend for anyone even thinking about buying a travel trailer or motor home. The guide is quite in depth and offers such information as a Manufacturer/Brand History, Use Classification, Construction Comments, Staff Reviews, Highway Safety, Price Guide (including prices based on buying used), and an overall Rating Summary. What's even more amazing is that the information is available for 55,787 different RVs built between 2000 and 2014. Furthermore, you can search and sort the information based on different criteria. What I found the most relevant for our purpose was reliability, highway safety ratings, and the price guides, since we would be buying a used travel trailer.
After MUCH searching, we finally settled on the brand Jayco because of reliability and safety and Jayco trailers are fairly abundant so the market was strong for second hand. We found one particular floor plan, the 29FBS, which would suit our needs perfectly. These are things that we liked about the 29FBS:
- A separate room, with two bunk beds, for our little girl, complete with a sliding door and her own dresser and closet.
- One large slide out on the entire living space providing much more area for "living."
- A separate master bedroom towards to the front of the trailer so we could maintain some privacy.
- Full shower with tub for bathing the little one.
- A bathroom door that can be locked into position that prevents our cats from getting into the master bedroom.
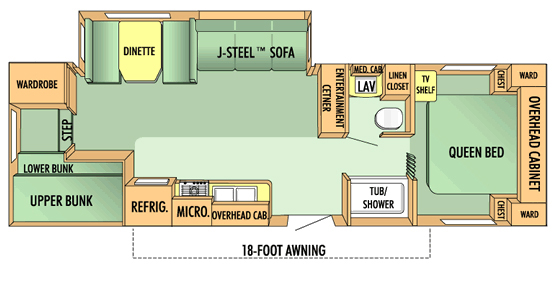
Our biggest issue was that Jayco stopped making the 29FBS in 2009. Craigslist was my first stop every morning and then a few more times throughout the day. I purchased the Craigslist App for my phone so that I could save searches and get notifications as new trailers became available. I also relied heavily on SearchTempest.com for searching a very large radius encompassing multiple Craigslist individual cities. This search website is AMAZING for anyone looking for anything to buy that might be local.
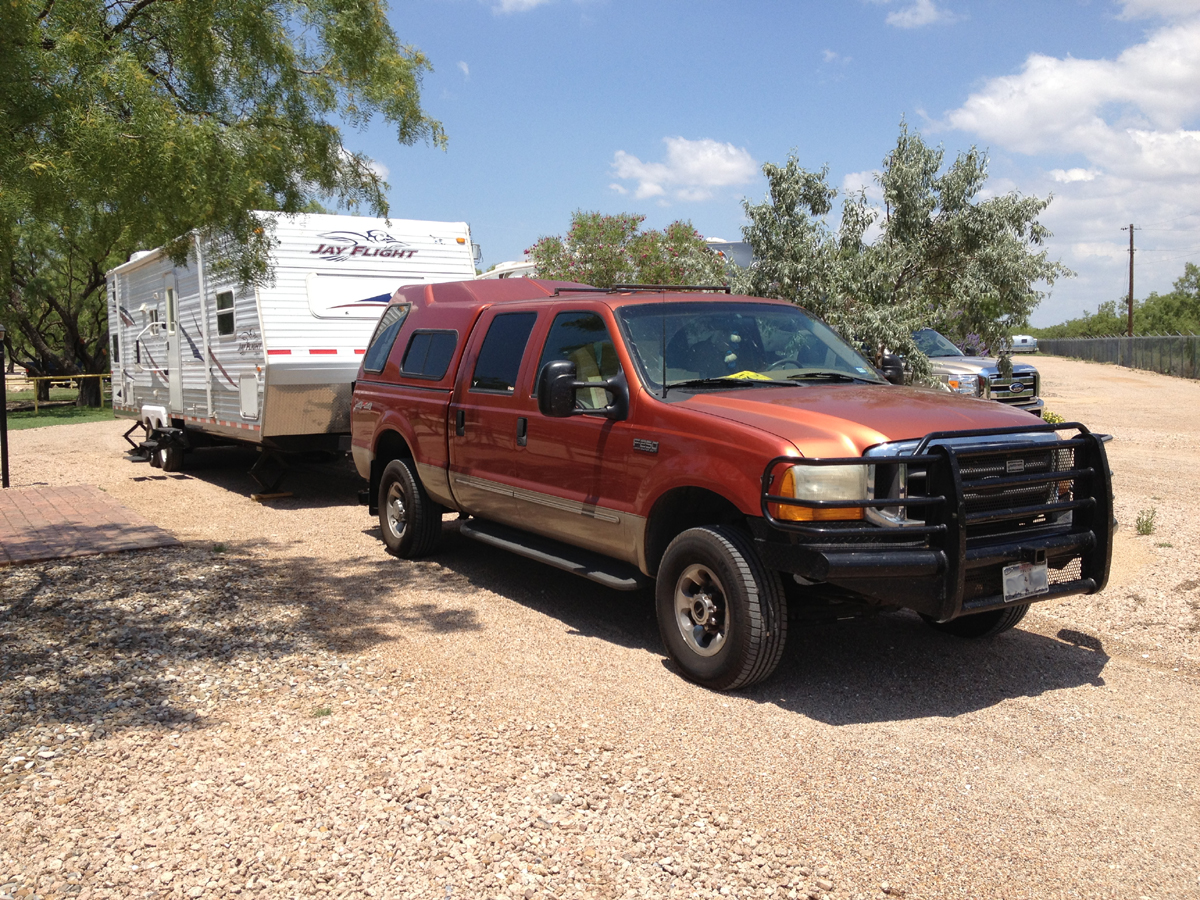
I only had about two months to find a suitable replacement trailer if we were going to make our May 31st intended launch date. We had a lot of excitement and heartbreak as four different deals with 29FBS trailers fell through. I was searching a 500 mile radius and had deals working in Louisiana, Oklahoma, and Texas. With time running out, I expanded my search to 1,000 miles all the way up to Iowa. Finally, a trailer became available just North of Fort Worth. I drove up and bought it immediately. The trailer was in great condition, clean, and was priced just under what I had expected. That evening, it took me about 2 hours to hitch up the Pullrite for the first time. I had to adjust the hardware a few times to get everything to work properly. I then made the long drive back to Austin, leaving around 9pm and arriving back in Austin after midnight. The running lights weren't working on the trailer (found out later it was because the 7 pin was wired incorrectly) so I was stopped by a State Trooper who was nice enough to just let me off with the advice of using my hazards all the way home.
.jpg)
Over the next two months, I moved the trailer around to four different places to have work done. I had the tires replaced, all systems checked twice, new brakes installed, the gas system pressure checked, and then added some extras to make our cats (and us) more comfortable...
|
|
The Transmission
March 2014
|
.jpg)
|
80 hours after bringing the new trailer home rather victoriously, the truck's transmission blew. I had notice the transmission seemed a bit looser and was actually on my way into the shop the morning the transmission completely died on me; engine running but NO forward movement at all. I was lucky to coast onto a side street with little trouble. I had it towed to one shop but they just wanted to drop in a new Jasper transmission at a ridiculous price. I might have fallen for it if they hadn't lied to me about the fluid being burned, which it wasn't. I guess they assumed I was ignorant.
|
|
I found Aus-Tex Transmissions at 9813 Beck Circle Austin, TX 78758 from a Google search and read through their reviews online. I called them to discuss my symptoms. After a few minutes of talking with the receptionist, she put me through to Pepe, the shop owner. He took about 10 minutes to talk me through what was likely my current issue and explained to me how they would go about fixing my existing transmission, rebuilding it with stronger diesel components. I had my truck towed again, this time, to Aus-Tex and they started work the next day.
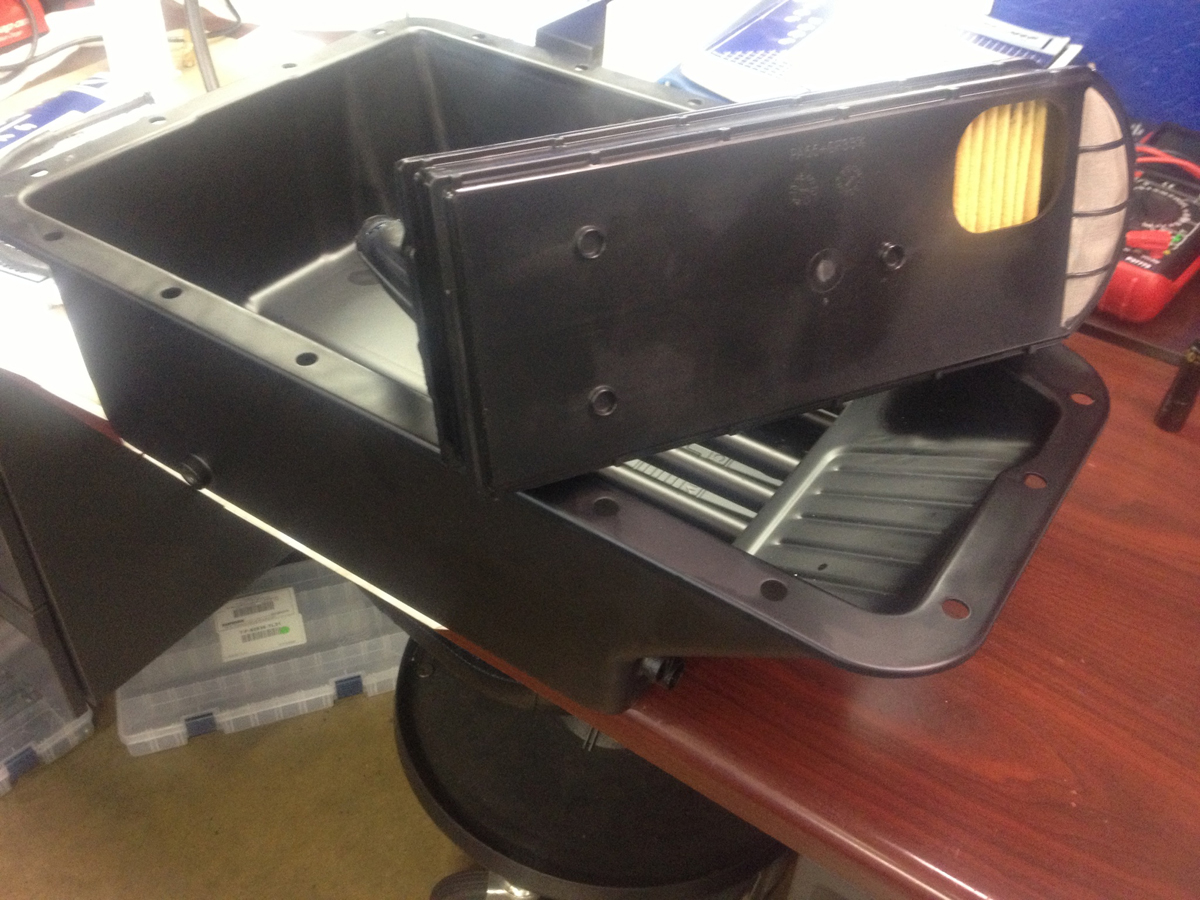
Pepe would send me texts with updates daily and even pictures of the work. He also took the time to answer all my towing questions and combat my fears about the truck handling what was ahead of her. It took about a week for the rebuild, but in my opinion the wait was well worth it. Just to be on the safe side and help with heat dissipation, I also had them add a much larger transmission pan to hold more fluid and a Scan Gauge so I could better monitor my transmission temperature and various other engine variables. The transmission is incredibly responsive now and shifts forcefully and with better purpose. Thanks Pepe!
|
.jpg)
transmission all broken down for repair
|
.jpg)
larger transmission pan
|
.jpg)
transmission ready for install
|
.jpg)
scan gauge installed
|
|
Test Run
April 18th-20th, 2014
|
|
Easter weekend, 2014, we decided to take the trailer and truck out for a test run. I mean, if we're planning on living in this trailer for 6 months to a year we might want to sleep in it just once before we move out of our house. It should also be noted that we had never done any trailer camping before. I picked up our trailer from storage early in the morning on Saturday and brought it back to the house. Craziness ensued, as you might expect, trying to pull things we might need for the weekend. It also didn't help that this test run was a somewhat ill-conceived spur of the moment decision just a day before. I don't think we were ready for the jaunt based on the haphazard preparation that resulted. It's not like everything in our lives was in total upheaval, by our own doing of course!
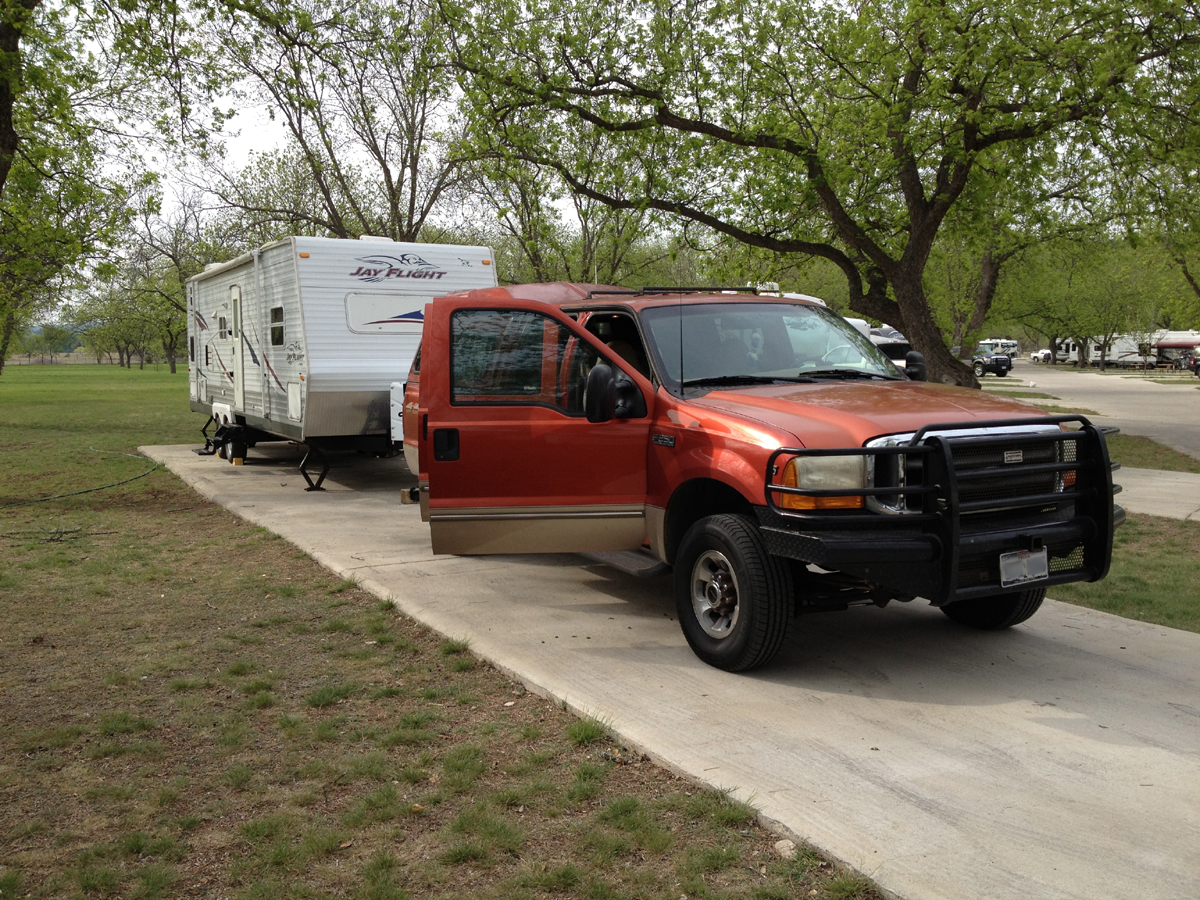
The trailer was difficult for me to maneuver through the streets of Austin but I only took out a couple of curbs. The hitch was going to take me some time to get used to. The truck handled the weight well, but the temperature reading on the Scan Gauge suggested otherwise. At 260°F+ running 55mph up some steep hills in the Hill Country on our way through Fredericksburg to Ingram, I just wasn't all that satisfied that when given longer more arduous days, we wouldn't run in to trouble. Also, the drive out further accentuated the need for a larger gas tank to add range to the truck while towing. Upgrading my gas tank was already in the planning stages...
Johnson Creek RV Park at 142 JCRV Dr., Kerrville, TX 78028 was very nice, nestled into a Pecan orchard just outside of Ingram on the Old Junction Highway. Many spots were pull-through but I was given a back in. This would be my first time backing the trailer into a spot with definite confines. Sure, I had backed it into the storage spot a couple times but it was a grassy knoll the size of a basketball court - and I really didn't do that all that gracefully or quickly each time. After some cussing, banishing Nicole and Z from the car, and taking several angry attempts at it, I finally cut the wheels the right way and pulled in (still not sure how it worked).
The weekend was OK. We hadn't packed any food in the rush so we had to go out to eat for every meal, which wasn't very smart with a toddler who prefers dancing and running to eating and didn't really give a good sense of what the food aspect of trailering would be like. Also, the propane system still hadn't been pressure checked so we didn't use the heat nor could we have cooked anything on the stovetop even if we had food. Our daughter's normal bed time of 9pm was pushed to almost 1am that first night, though it improved a little the second night, because of the excitement of sleeping somewhere new. We were also up early in the morning with first light because the trailer has less window dressing than our house so we weren't used to that extra light. We didn't take the cats with us because I still had nowhere for them to hide/use the litter box. Being in the small space and the wonky schedule made me a bit apprehensive about the trip. To me, everything was a bit chaotic. Nicole and I talked a lot about how we were maybe a little crazy after all but knew we could adapt once we thought things out more.
|
.jpg)
parked at our very first rv campground
|
|
Larger Gas Tank & Another Transmission Radiator
April 2014
|
|
After pulling the trailer around to different businesses to have work done, I took note of my MPG in the cities and on the highway. At an average of 7 miles per gallon it was about 3 MPG less than I expected. Yuck! I sat down one day and redid the math on the cost of gas for the trip but also realized in one of those awful epiphanies that I would need to refill my truck every 175 miles. That meant a LOT of stopping with a trailer and trying to navigate gas stations. 300 miles would be respectable, but 175 was not going to cut it. I looked into Propane conversion for a while and thought I had a trade set up with a guy that needed a new website built but that fell through. And paying the $5k out of my pocket to make the conversion was something I just couldn't justify. ROI was less than 40k miles but we would be done with the trip before realizing any monetary benefit.
|
|
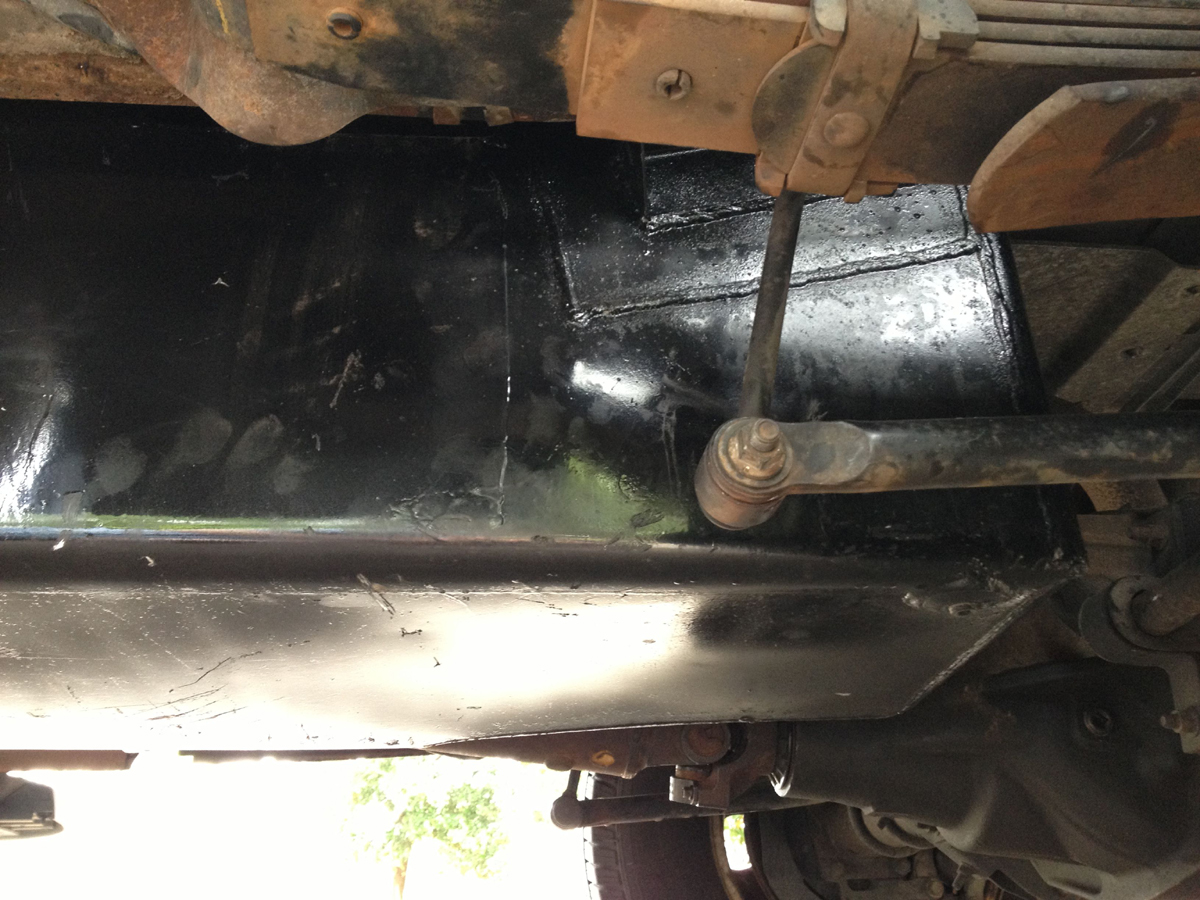
I mentioned earlier that Pepe over at Aus-Tex transmission had been so kind as to answer a lot of my questions about towing. I had posed the issue to him and he told me about a friend of his that had a '99 Ford F250 just like mine with a 51 gallon Titon gas tank that he was looking to sell. The gent had put 400K miles on his truck making long hauls to Mexico and as the truck was entering its twilight he was using it for around town stuff. To finance the cost of some much needed repairs, he was looking for a buyer for his enormous gas tank. I made him an offer and he accepted. Shortly after the test run, Easter weekend, Pepe transplanted my tank to his truck and his tank to my truck and we were all set.
|
.jpg)
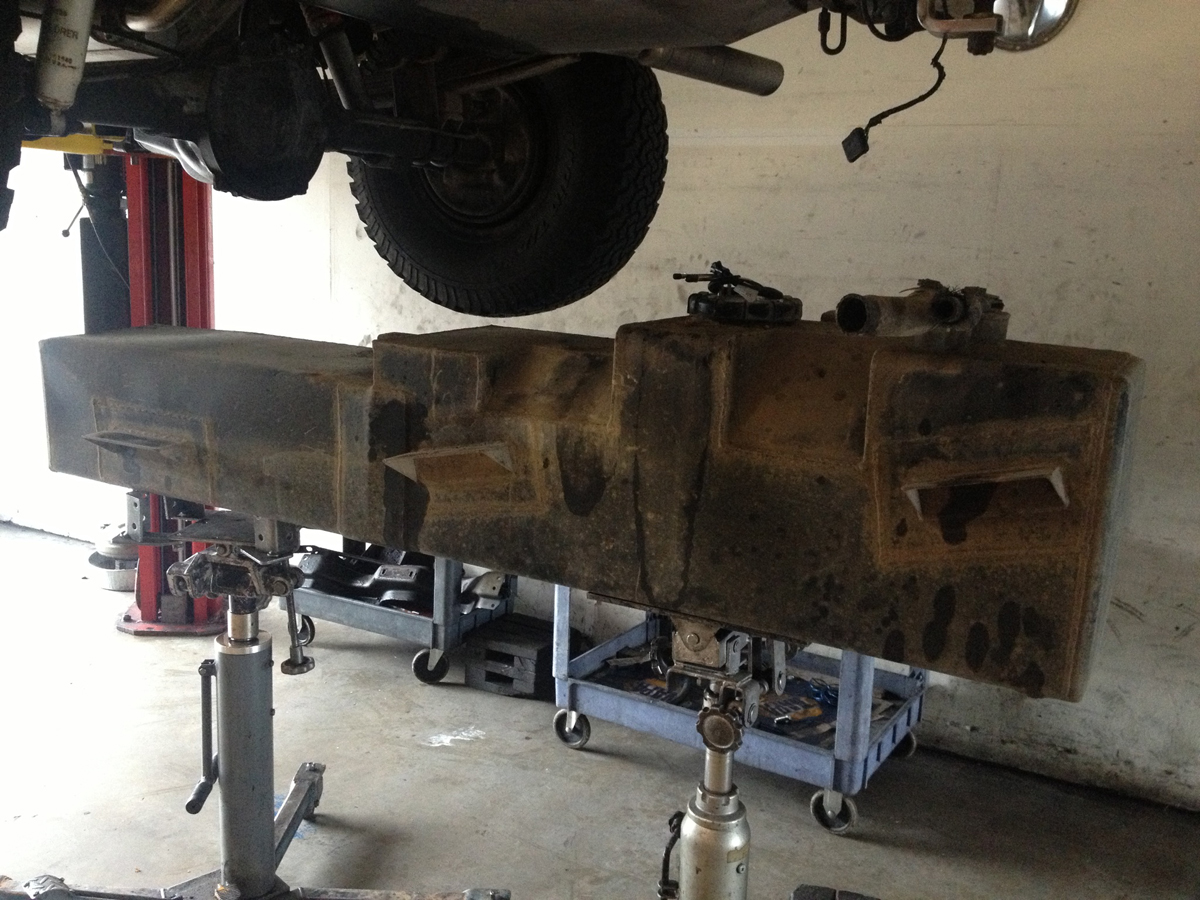
pulled titon gas tank
|
.jpg)
new coat of paint
|
The tank was/is a bit beat up from the years of use, but still works great. It is a monster! It spans almost seven feet; the distance from the rear differential to the transmission. Pepe was also happy to slap a new coat of paint on it. The gas gauge is bit wonky now and the overhead display gets really thrown off when trying to calculate miles to empty, but otherwise, I couldn't be happier. Having a larger gas tank helps me make those 300 mile legs and most times I'm able to get to the RV Park for the night, unhitch, and then fill back up. This was a great investment and for me it has paid for itself over and over in reduced stress.
|
.jpg)
titon gas tank installed
|
.jpg)
titon gas tank installed
|
|
|
|
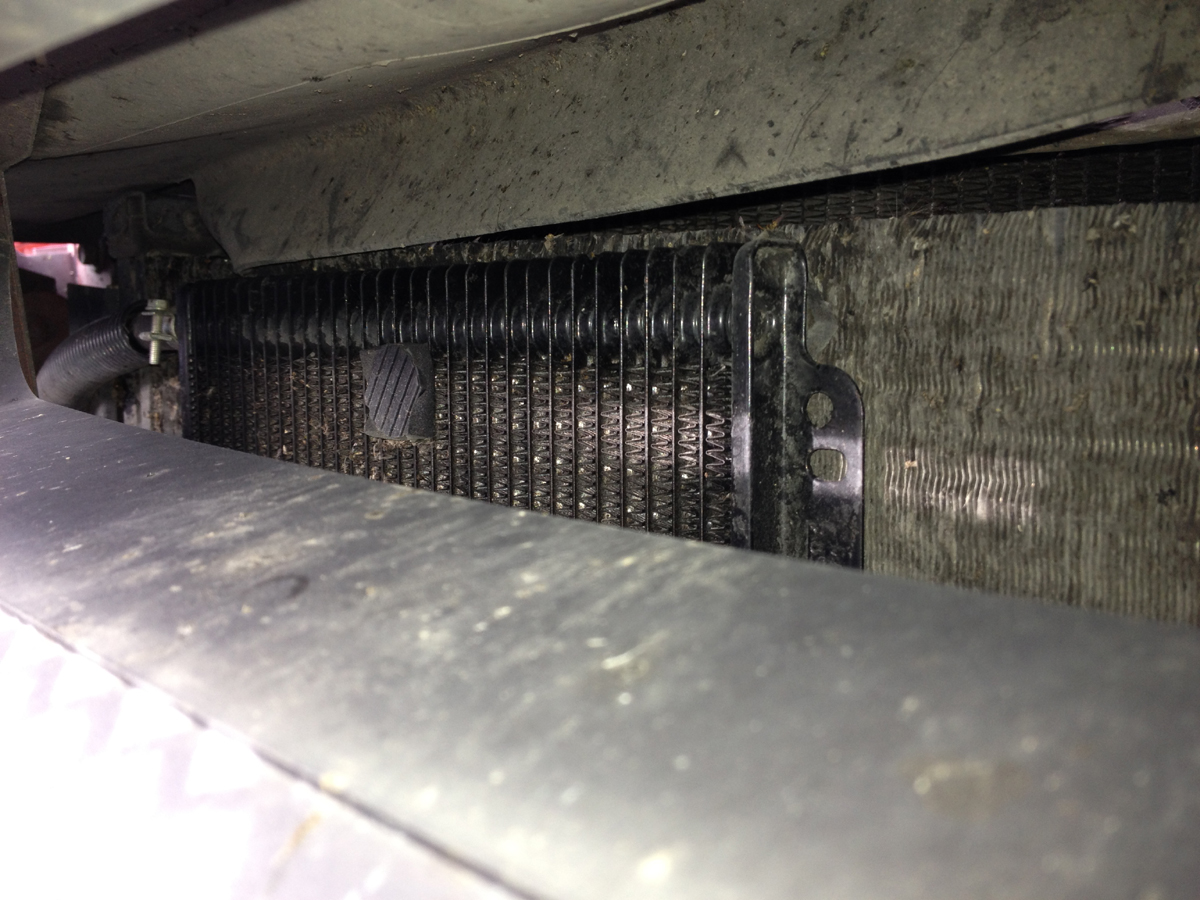
I had noticed on the Easter weekend test run that my transmission temperature was hitting 260°F+ even though Pepe had added the larger pan and the truck already had a transmission radiator that came standard. Even though that temperature was being read internally on the solenoid block, I still wanted it better controlled. Pepe installed a second transmission radiator and now my temp stays in 230°F range even on the toughest days. The truck tows like a champ now; she can handle the 7,000 pound trailer at 70 mph for 400 miles with no problems. I finally felt like the truck was ready to go.
|
.jpg)
another transmission radiator
|
|
Odd & Ends
April-May 2014
|
|
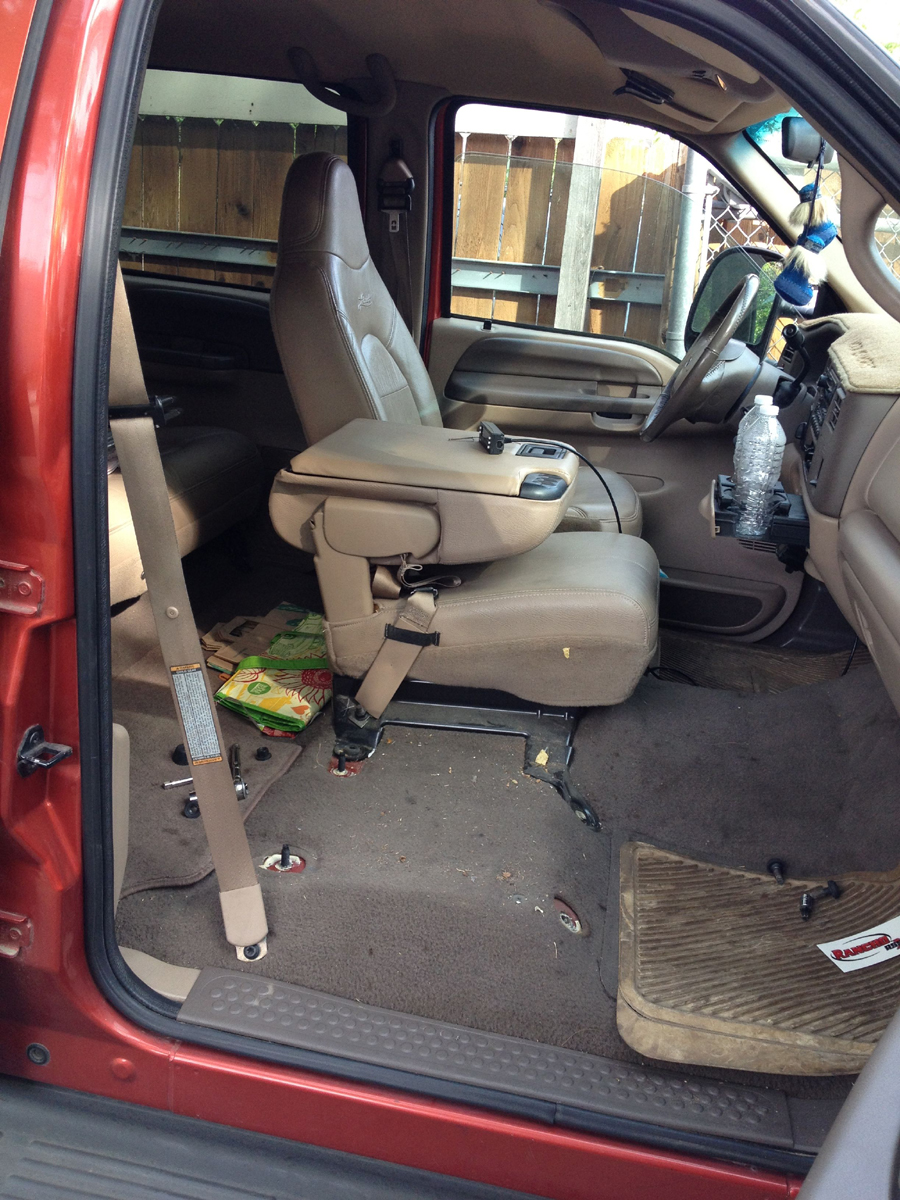
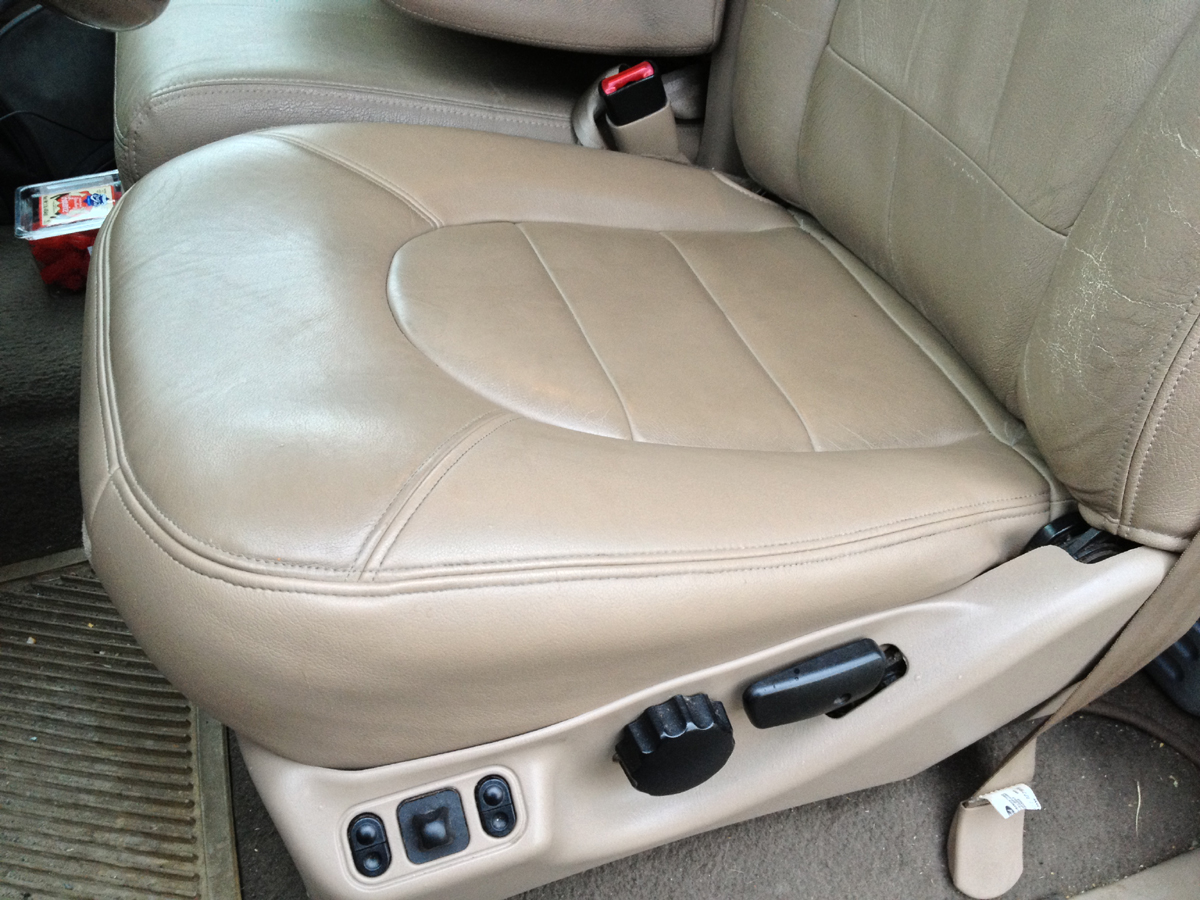
Leather: I've had my truck since 2000. We've been through a lot together and through the years, my butt has been planted in that driver seat for more than 200k miles. The years of hot Texas summers have not been forgiving on her original Lariat leather interior. The driver seat started to tear and the underlying foam cushion was exposed. It didn't take long for the foam to start breaking down once the leather was torn. I found a shop online with original OEM leather seats and even the driver side foam in stock. Everything was on sale - something about my truck being old and not much need for these parts any more. Lucky for me Cardenas Upholstery shop is right next door to Century Automotive so while I was having Century work on some things, I got the guys next door at to help me out.
|
.jpg)
seats pulled out being worked on
|
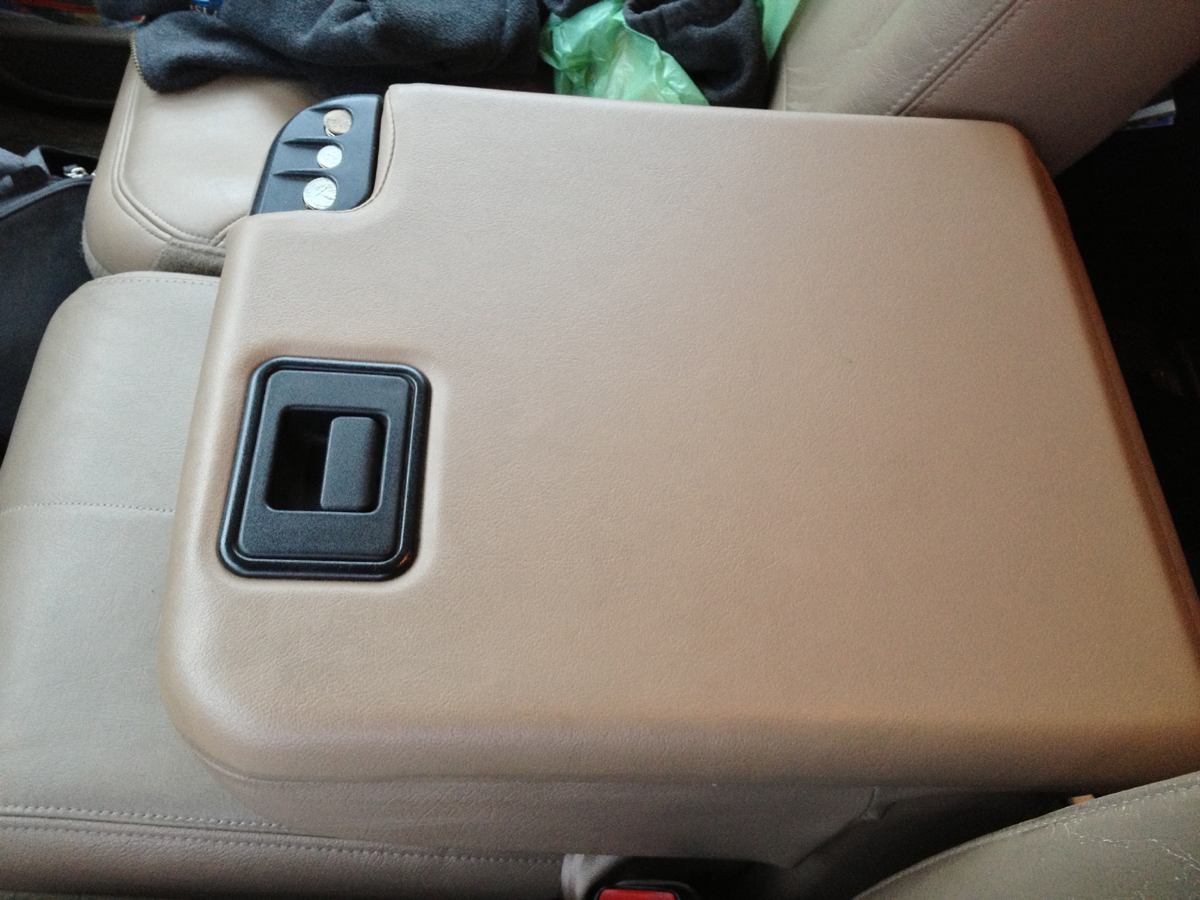
Cardenas Upholstery at 5220 Jim Hogg Ave, Austin, TX 78756 installed my new leather seats properly and at a fair price. However, over the coming weeks the fabric portion that is used to wrap around to the back side of the seat started to stretch such that the leather portion of the seats started pulling forward. I was very unhappy, needless to say. It turns out that the seats were original and that the fabric had aged over the years in storage and the natural elasticity of the fabric was shot. When installed, you can't even see the fabric but if it cannot be pulled tight, then the seats don't hold taunt. I took the truck back and the guy there at Cardenas pulled the seats, cut off the fabric, replaced it with synthetic leather that is stretchy, and reinstalled the seats. The seats look great, and 12K miles later are still in perfect condition. They also installed a new cover for my console. I'm very pleased with the service and quality.
|
.jpg)
new leather seats
|
.jpg)
new console cover
|
|
|
|
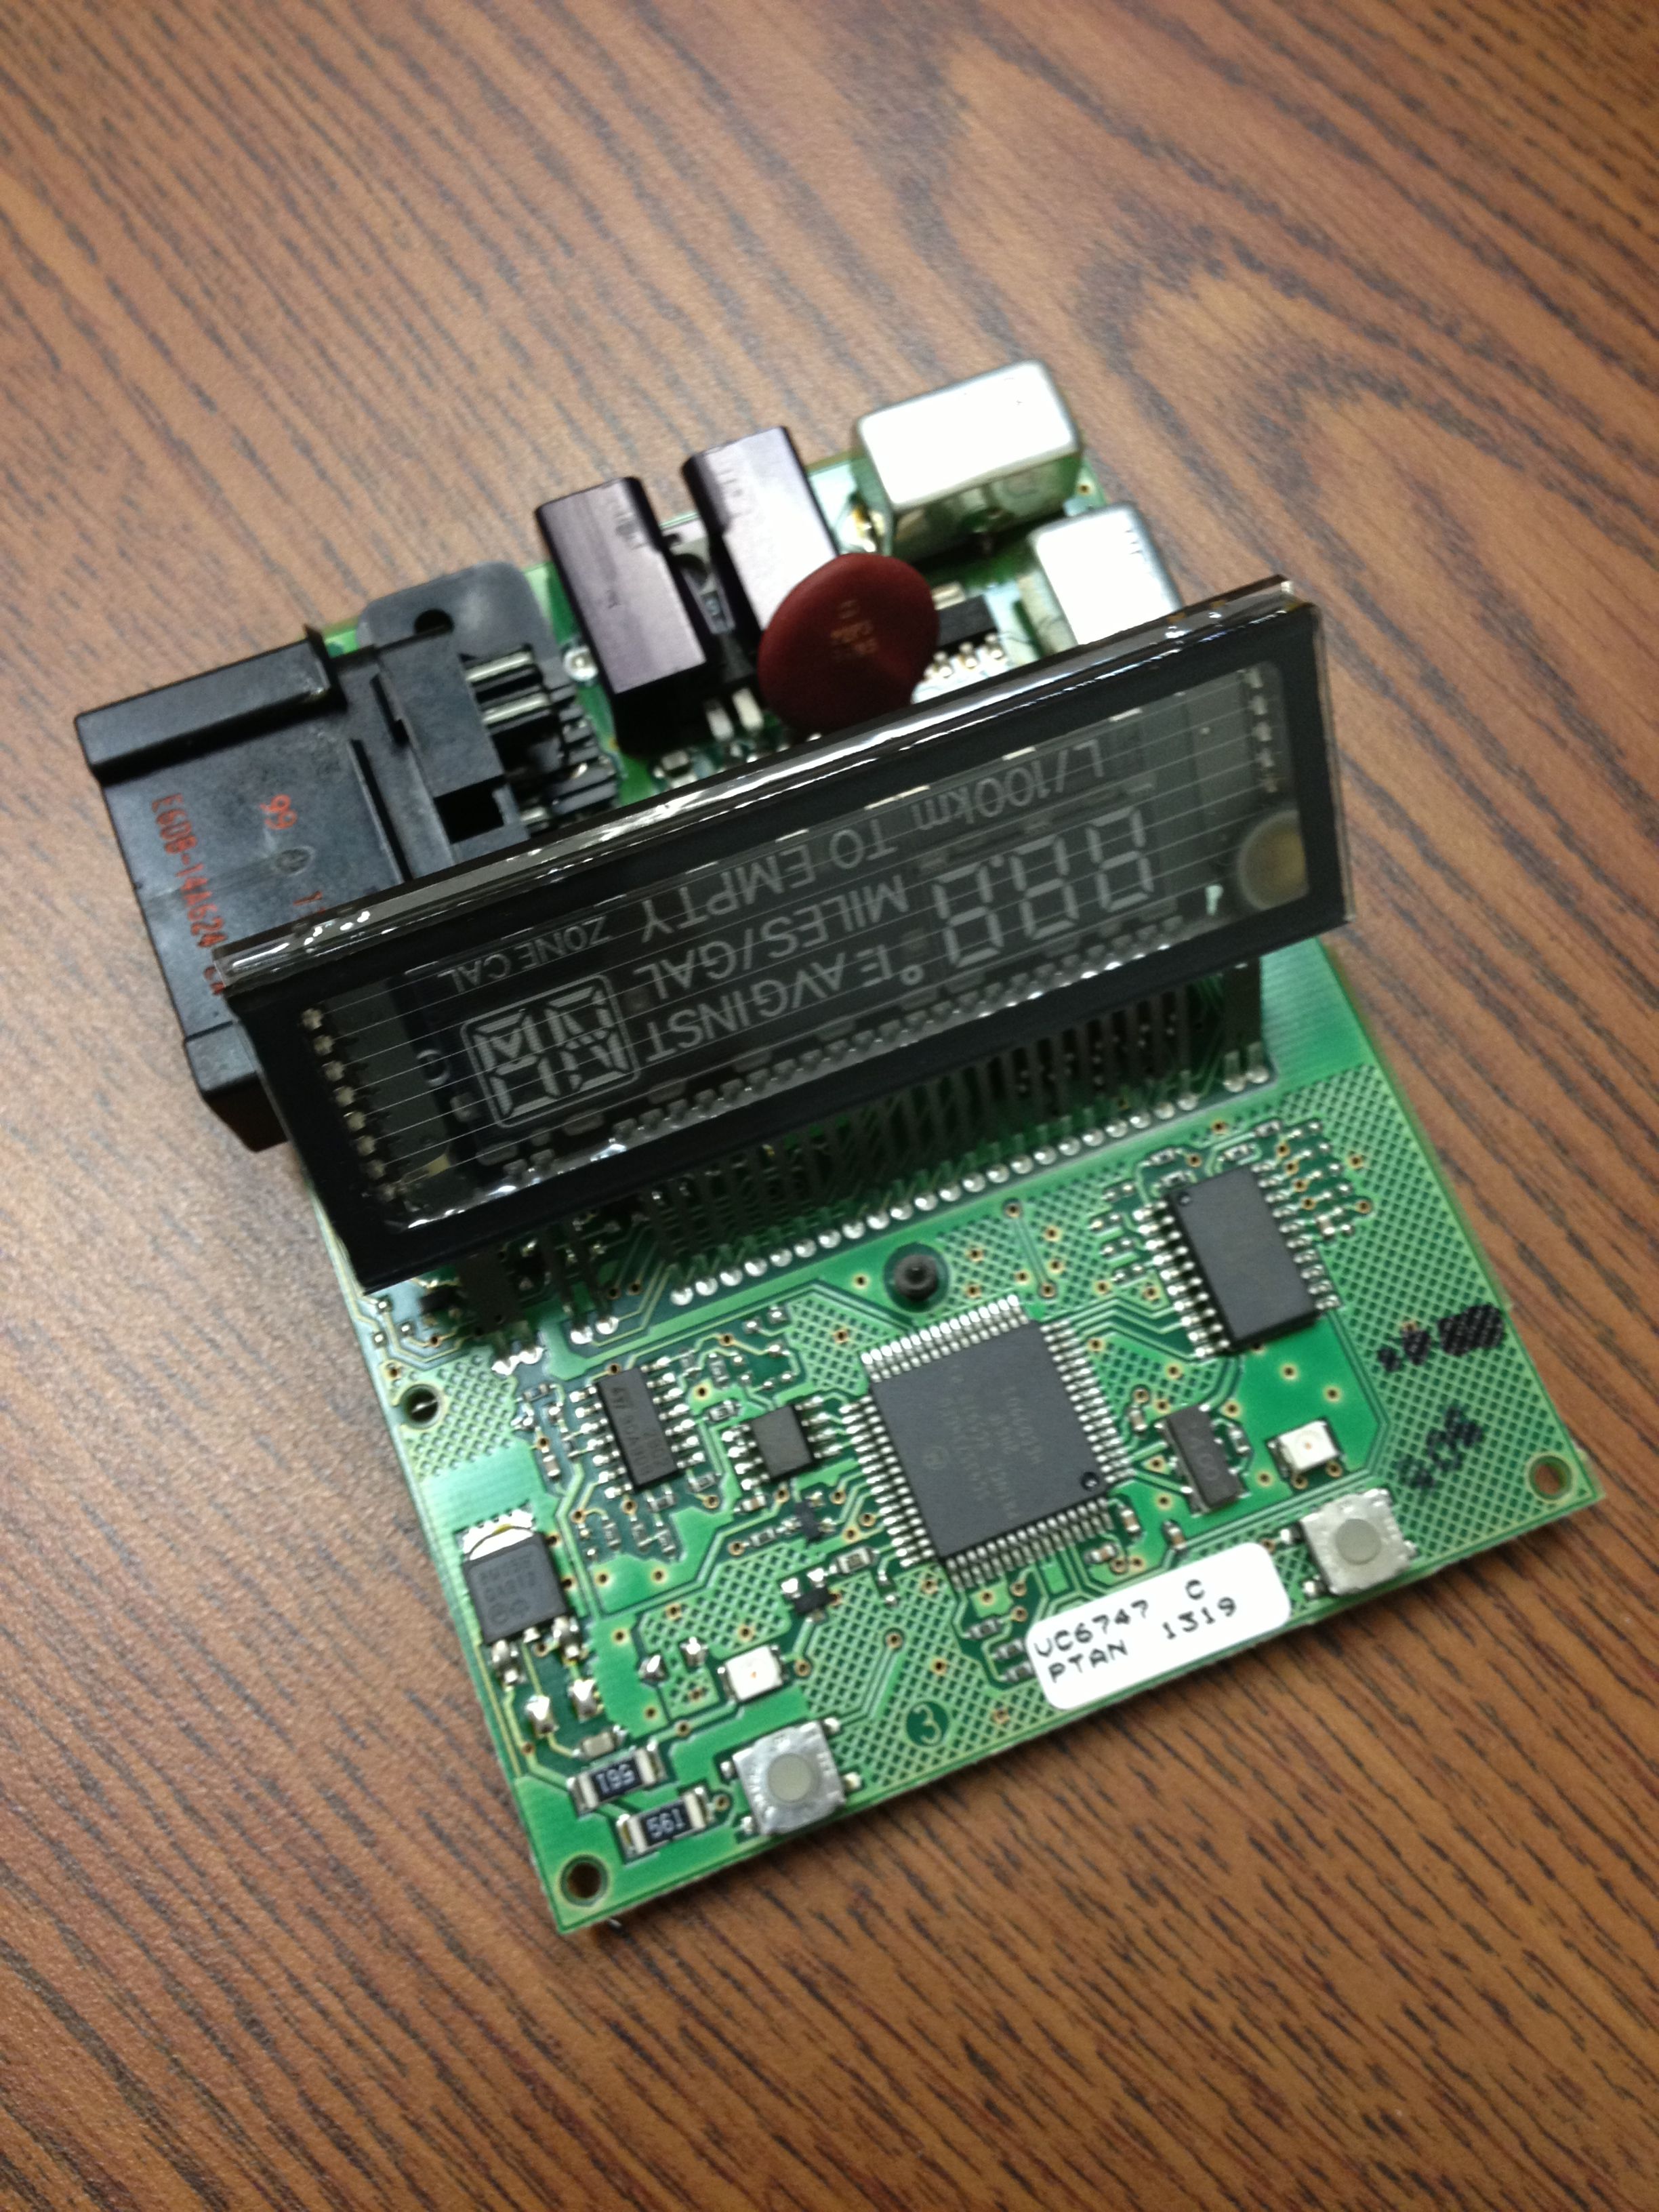
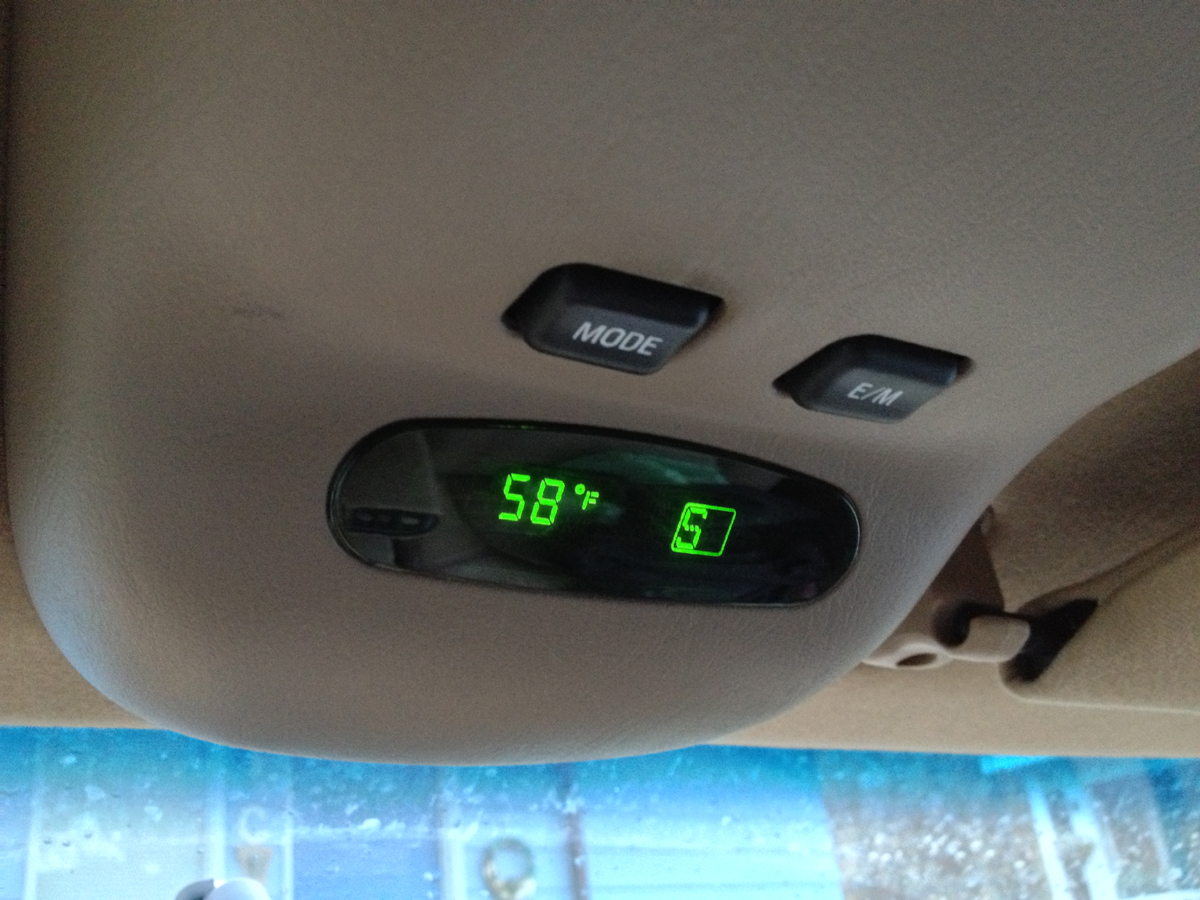
Overhead Display: A few years after I first got my truck, the stupid overhead display started working only intermittently. A good smack would sometimes set it right but that "fix" only worked for a few months. Aside from direction, it only displays three things: mileage to empty, miles per gallon, and outside air temp. I rather like knowing the temperature outside as this helps with understanding my engines internal temperatures better. I wasn't willing to pay the ridiculous price the Ford dealership quoted so for years it has sat quietly dead.
|
.jpg)
display pulled
|
|
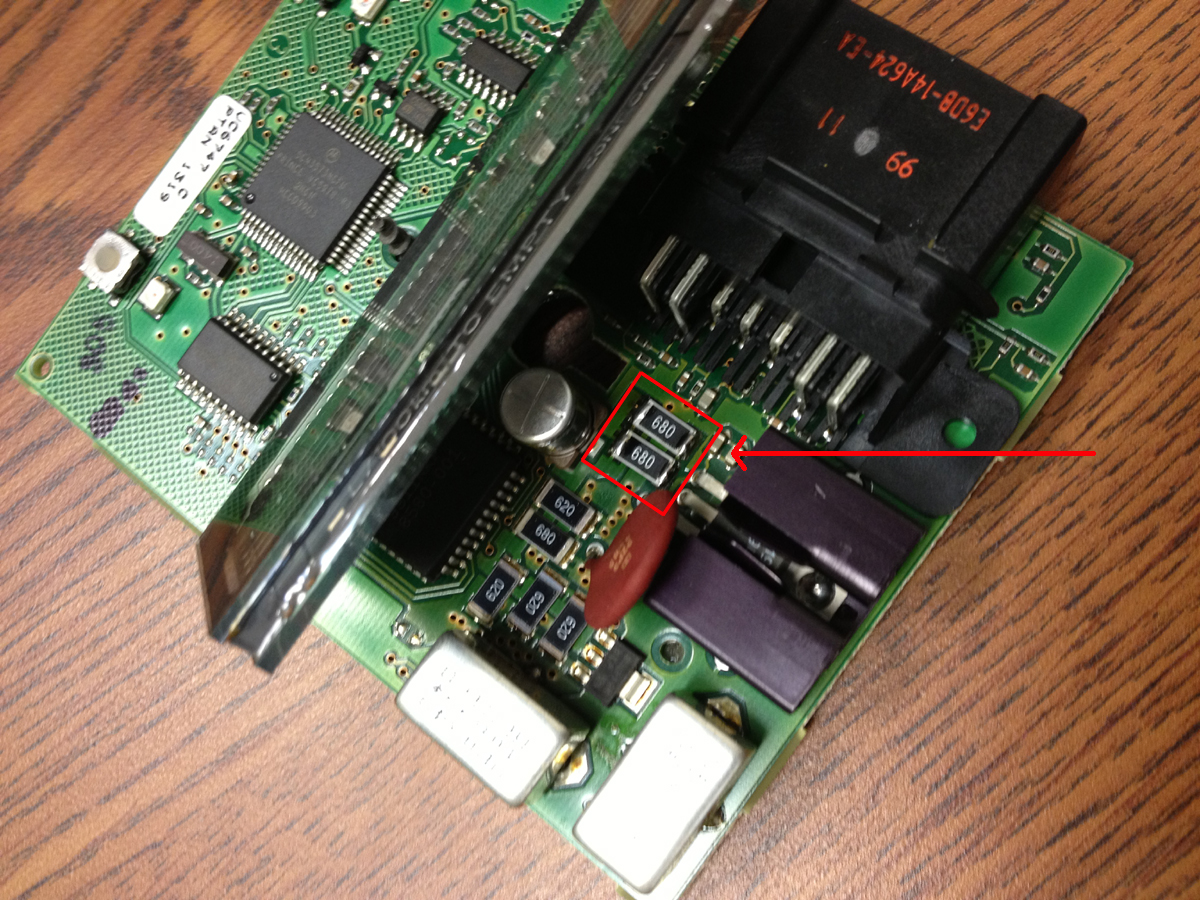
While getting my transmission worked on, Pepe noticed the dead display and, just in passing, mentioned that you could find instructions online for fixing it yourself. Turns out, this is a VERY common issue. A few resistors get hot enough to actually de-solder or crack themselves free from the circuit board. Very easily, I found the suspect resistors. A coworker (thanks Ray!) helped me get the right parts from Digikey and a few days later when they arrived I had another coworker (thanks Mr. Tam!) solder the new resistors on. I popped the display back in the truck and viola, working display again.
|
.jpg)
bad resistors replaced
|
.jpg)
resurrected overhead display
|
|
|
.jpg)
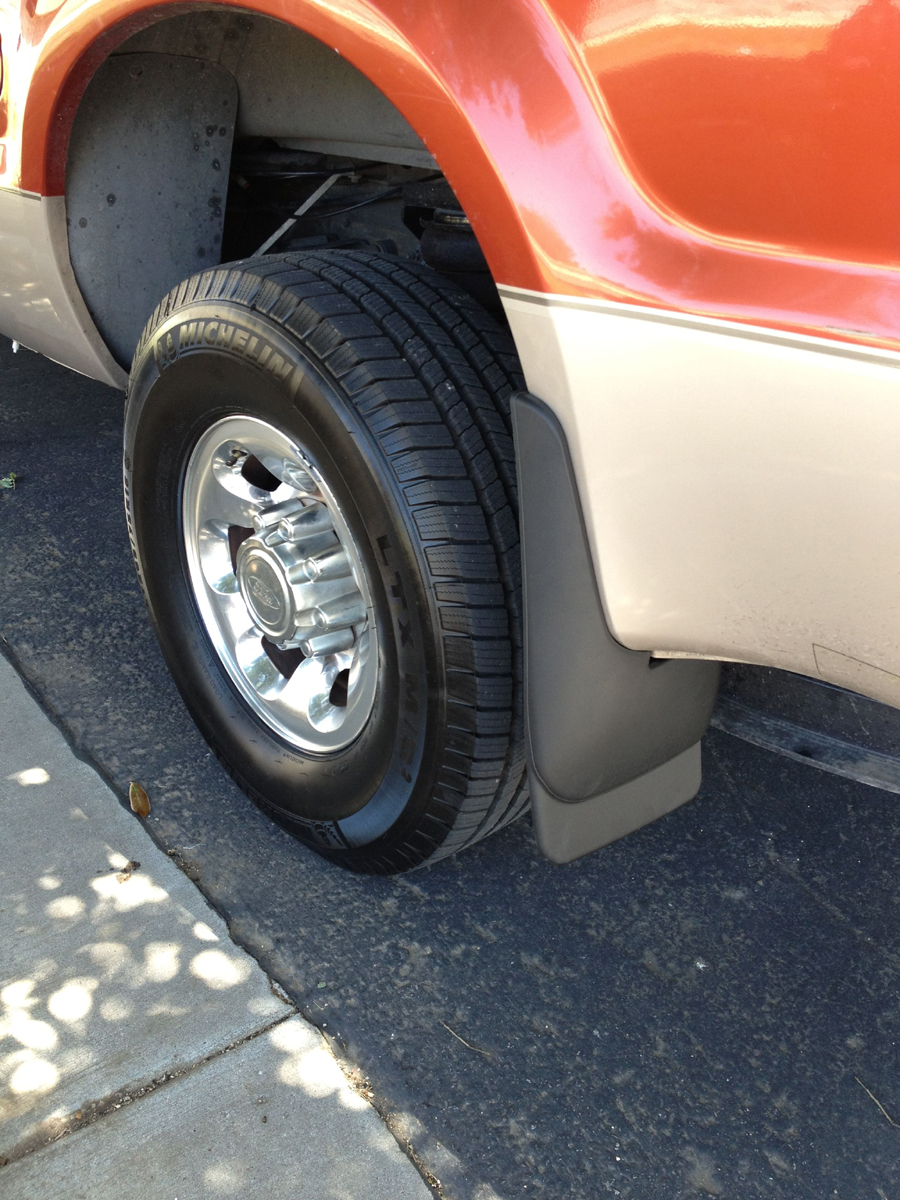
mud flaps
|
Mud Flaps: Something simple, but very essential when driving on the Alcan. It is important to protect the trailer from road debris. Thanks go out to Mike over at Pickup Heaven at 9600 Interstate 35 Frontage Rd, Austin, TX 78753 for the reasonable price and quick install.
|
|
Spare Tire Mounts, Gate Flap, & Hitch Step
March-May 2014
|
|
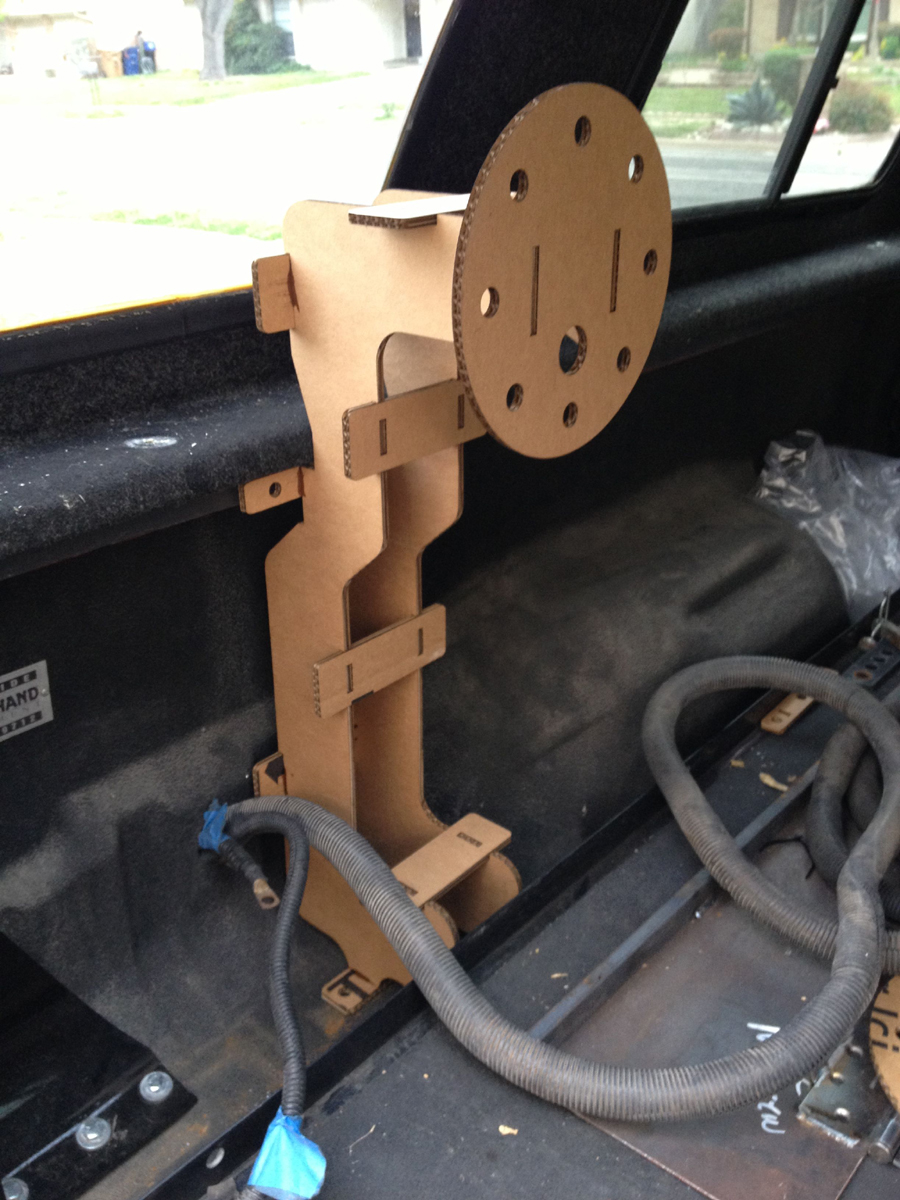
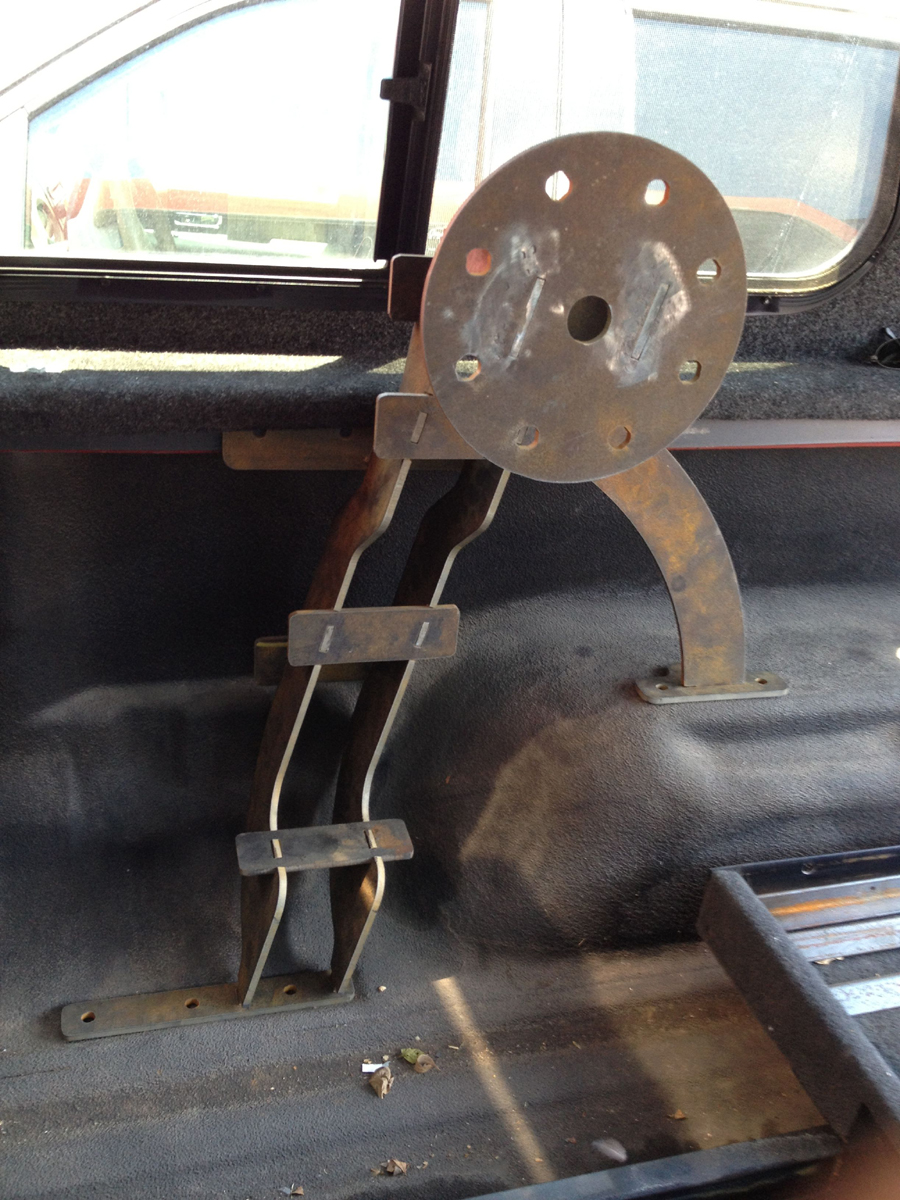
The tire mount project took about two months and only reached final completion about a week before we left Austin. I carry two spare tires with me at all times. This is left over characteristic I adopted from our last trip from making the long drive up the Alcan Highway. While there are mechanics and tire shops available along the 2,600 miles, it just makes sense to be prepared in case you're in the middle of nowhere or if you don't like someone's price and/or timeline to fix your flat. Once the Pullrite hitch was installed, I no longer had room for a spare under the bed of the truck. This meant that both of my spares would need to be in the bed of the truck and as the tires are fairly large it would destroy a lot of useable space if they were just going to lay flat.
My initial idea was to build mounts that would hold the tires at the end of the bed close to the tailgate. This way the tires would be easily accessible in an emergency. My first prototype was a bit flimsy and a friend (thanks Jose!) suggested that I add some cross bars for better distribution of forces. I had a friend (thanks Ron!) cut my designs out of cardboard so I could mock up my mount and check the fit. Once fitted into the back of the truck and after propping up a tire against the cardboard mount, I realized just how stupid this placement was going to be. You see, I have a Bedslide as well in the back of the truck. This allows me to fill the bed up with boxes and totes and then slide the whole mess of it back out of the truck...like a big drawer. With the tires at the back near the tailgate, any boxes that happen to slide out into the open spaces of the drawer would then hit the tires and prevent the drawer from extending. I would have to climb into the back and line up all the boxes so they would clear the tires each time I needed to get anything out.
|
.jpg)
tire mount rev1
|
.jpg)
tire mount rev2
|
.jpg)
fitting rev2
|
.jpg)
rev2 tire mount with tire
|
|
|
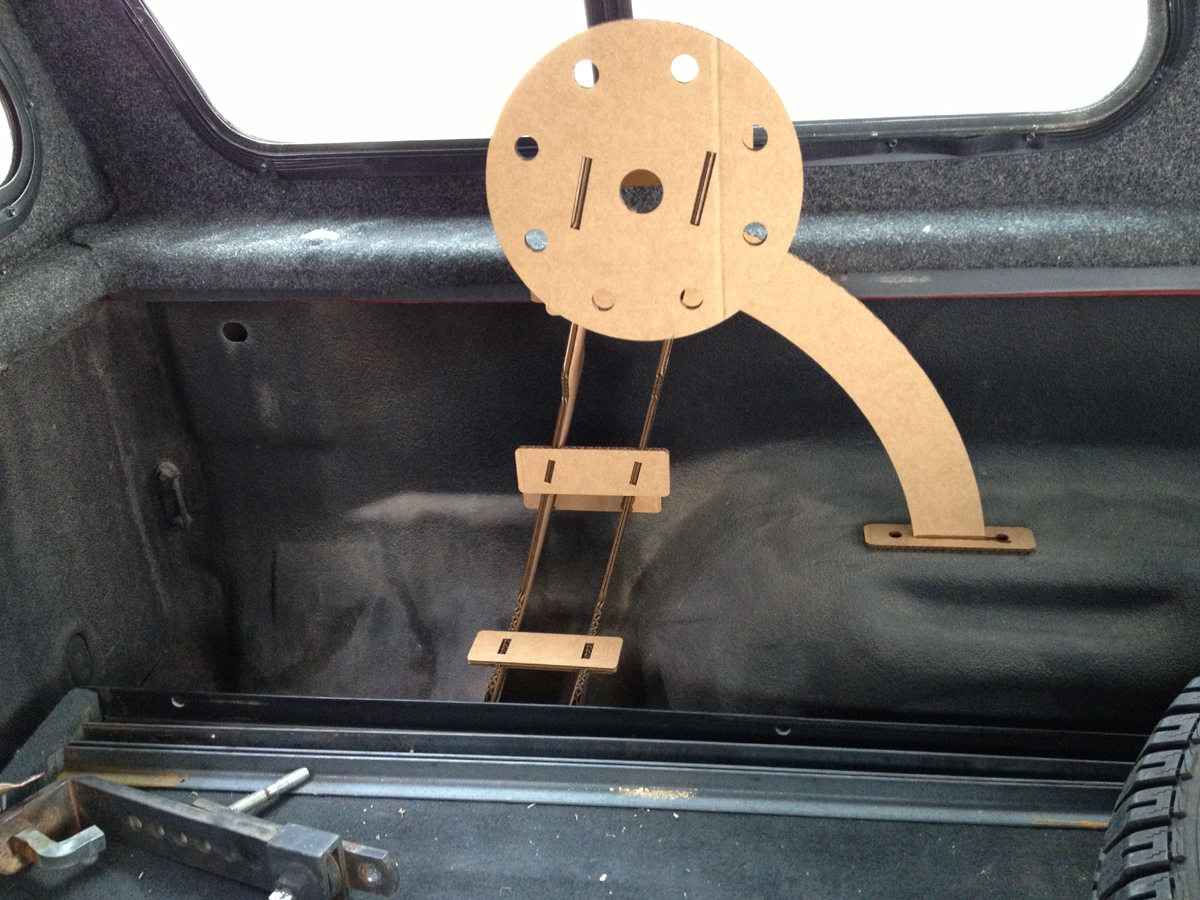
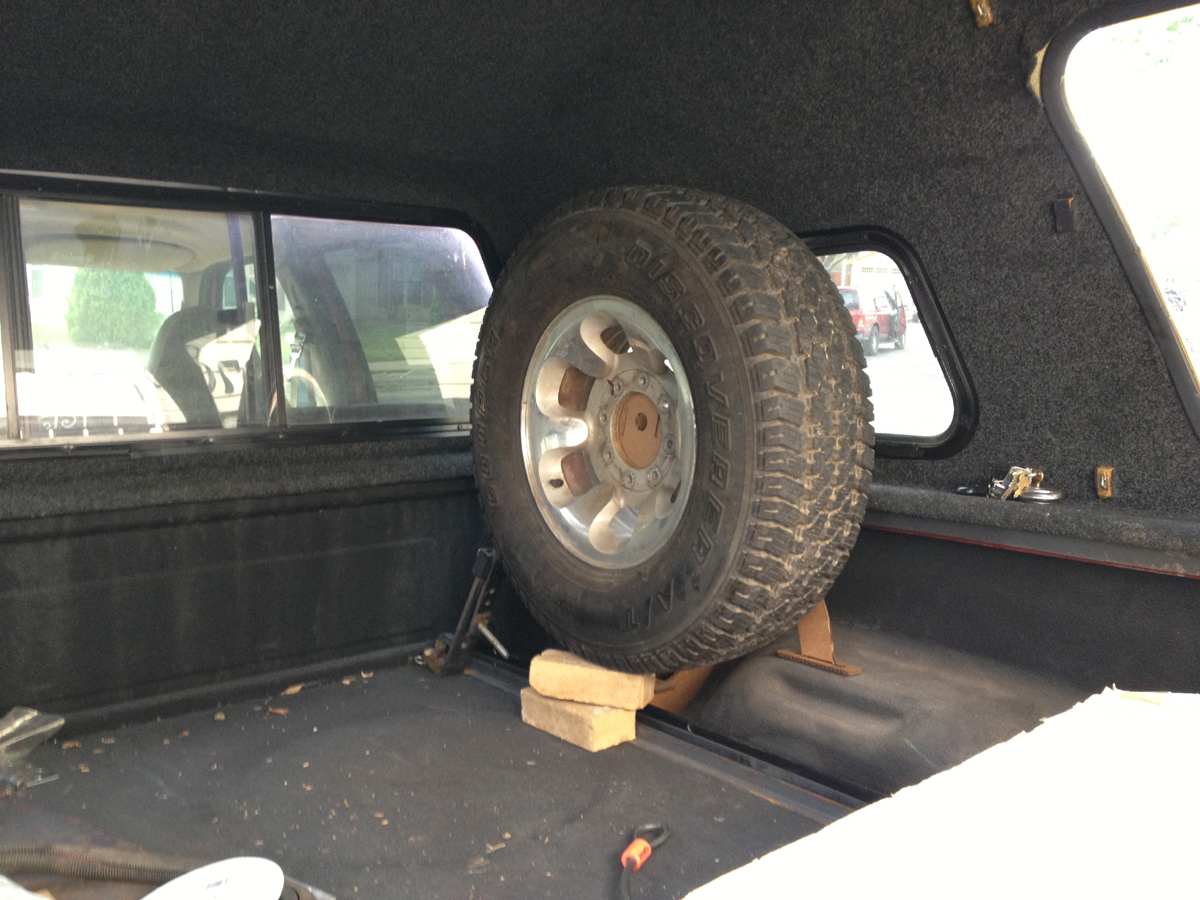
A better idea would be to position the tires closest to the cab so that anything on the Bedslide that shifted around while driving would not inhibit the slide from then being extended. I took my first cardboard prototype and shifted it to the back. As expected, there was no way I could use my current design as it was but after a few minutes of head scratching, realized that if I tilted the mount about 15° changed the "foot" structure, and added a buttress, I might be able to use much of my first design. Back to Corel Draw for another rev. Once again, I had my design cut into cardboard (thanks Ron!) to check the fit and resulting placement of the tire.
|
.jpg)
rev3 tilted design
|
.jpg)
rev3 cardboard fitting
|
.jpg)
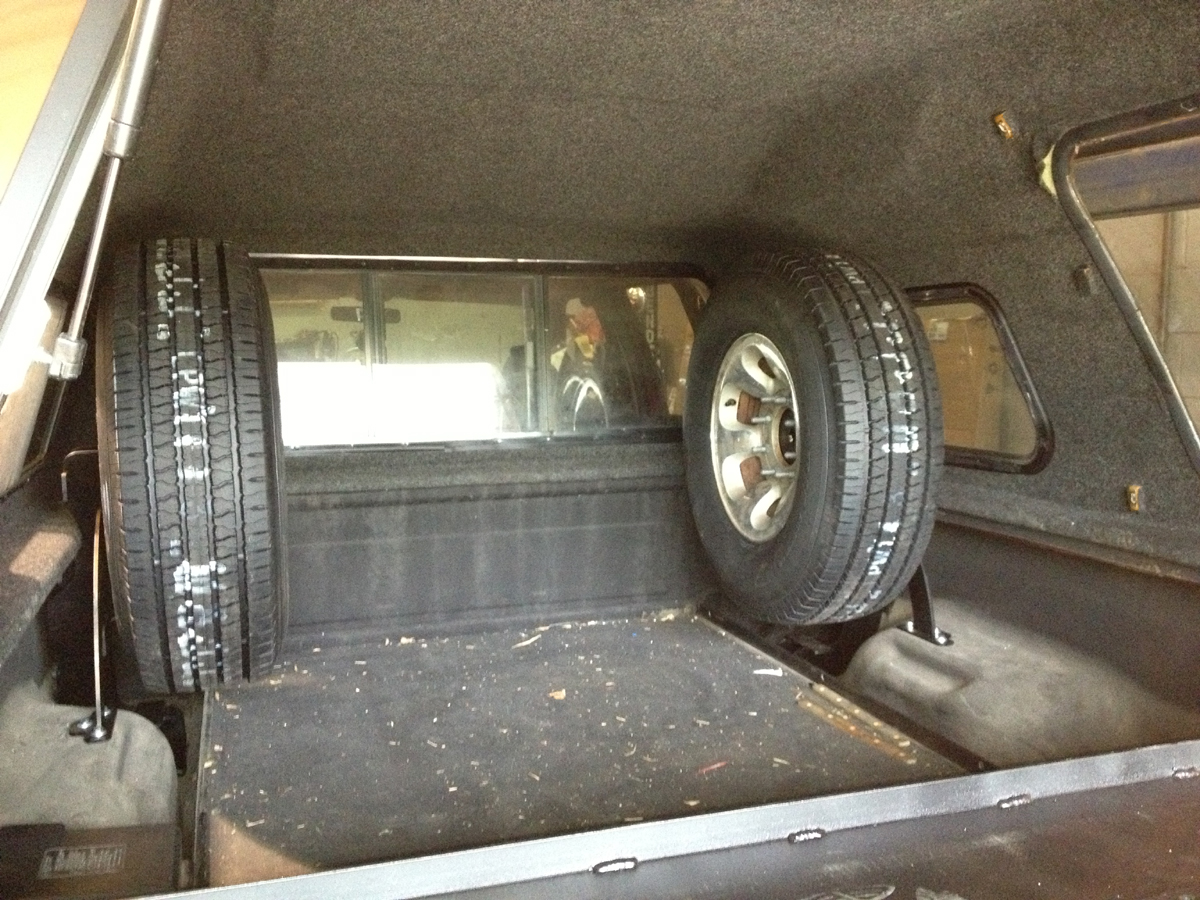
ideal tire placement
|
|
|
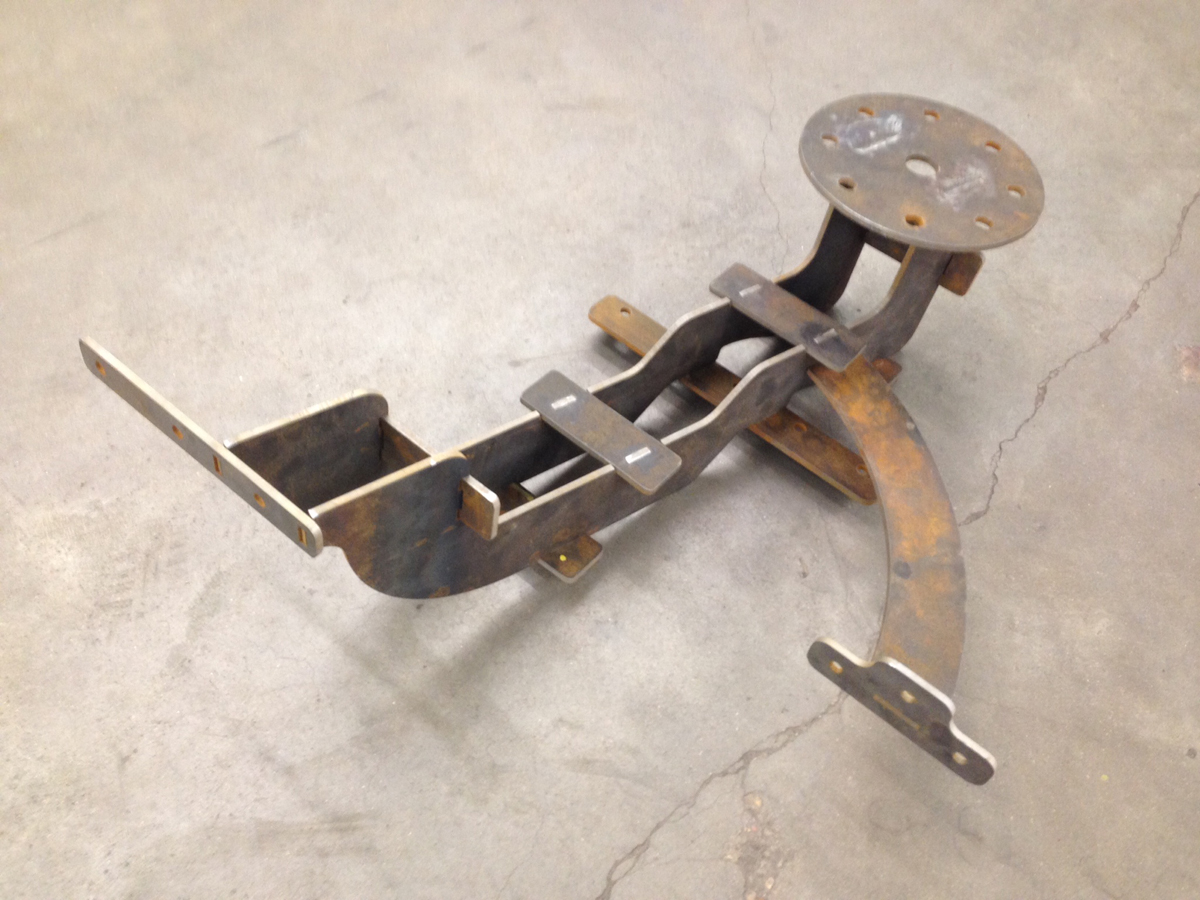
This new design fit well and only required a few small tweaks to beef up some of the attachment points with the truck bed. Next, I sent the files off to another friend (thanks Kevin!) who was able to get the parts water jet cut into quarter inch plate steel. Kevin put in a lot of time and effort getting my files prepared for the water jet, stayed after work to cut the parts himself, assembled the parts once cut, and ferried the mounts back and forth as we checked their fitting. Finally, I was satisfied with every aspect and the mounts were welded. I got the mounts and went to check that the lugs fit the tires and sadly, the lugs and holes did not match up. Seems my lug holes had some slop in the design which allowed for slight movement once the lugs were placed. At the mercy of the welder, some lugs were spot on and others were completely off. Kevin took the mounts back and one of my spare tires and had the bolts cut free and re-welded using the spare as a guide.
|
.jpg)
tire mount ready for fitting before welding
|
.jpg)
tire mount perfect fit
|
|
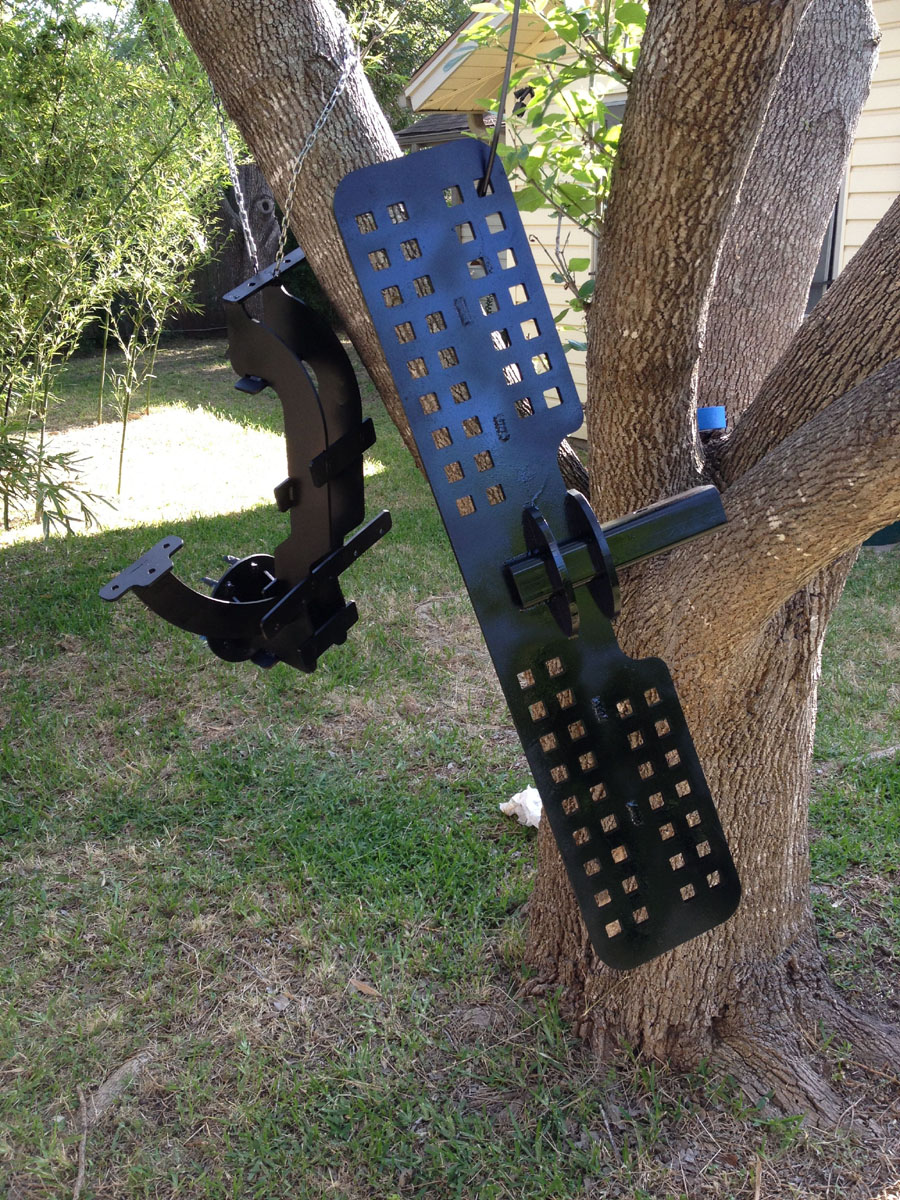
Once the mounts were complete and welded, I bought some automotive paint from an auto store and went about painting them to prevent any rust development. The original plan was to have Alpha Painting powder coat them for me, which they were willing to do, but I just ran out of time and had to move quickly. I suspended the tire mounts from the tree in the back yard and coated them several times.
.jpg)
Finally, the day arrived to have the mounts installed. Again, Mike over at Pick Up Heaven assisted. He was able to install the tire mounts and when asked if he thought they were strong enough, he stated that I could easily hang a cow from each mount! He told me they were the most over-engineered tire mounts he had ever seen, which I took as a compliment.
|
.jpg)
ready for install
|
.jpg)
tire mounts installed
|
|
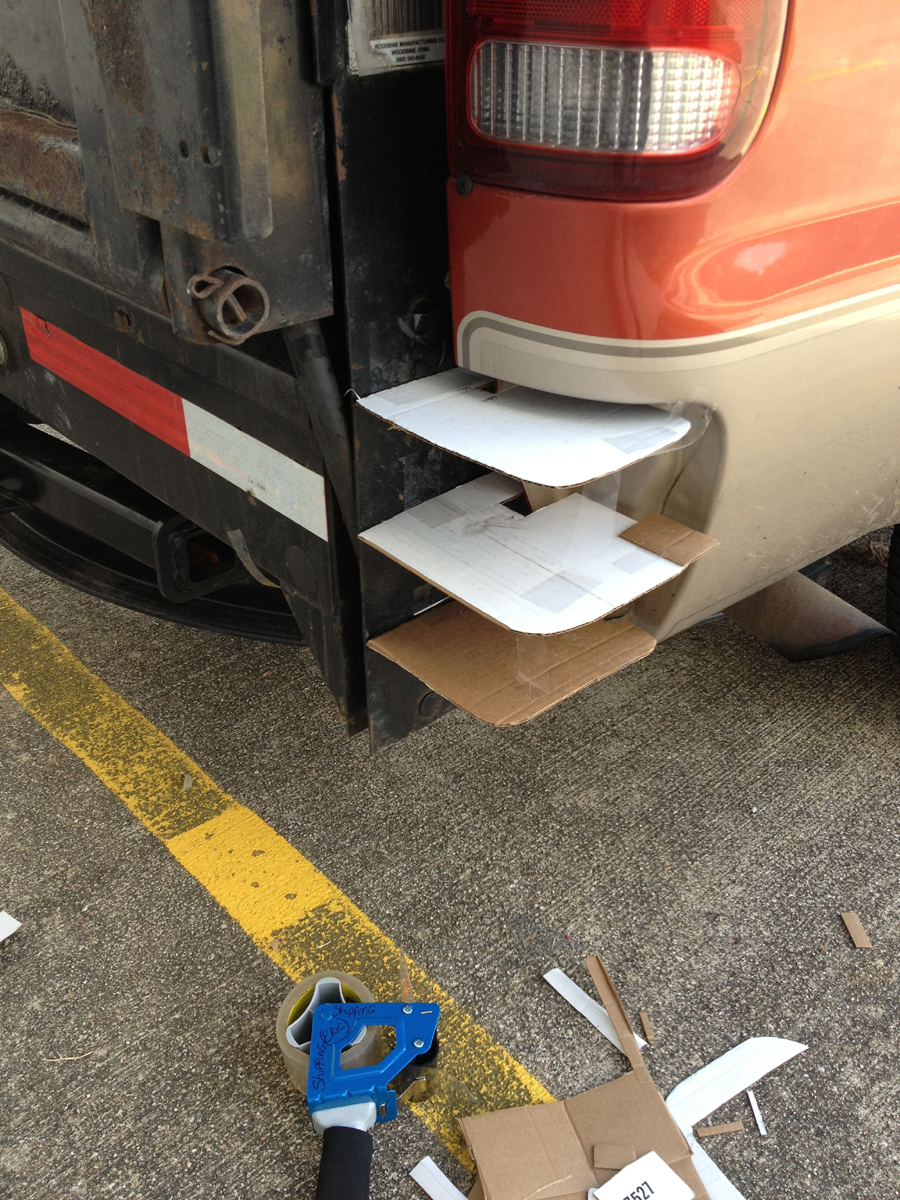
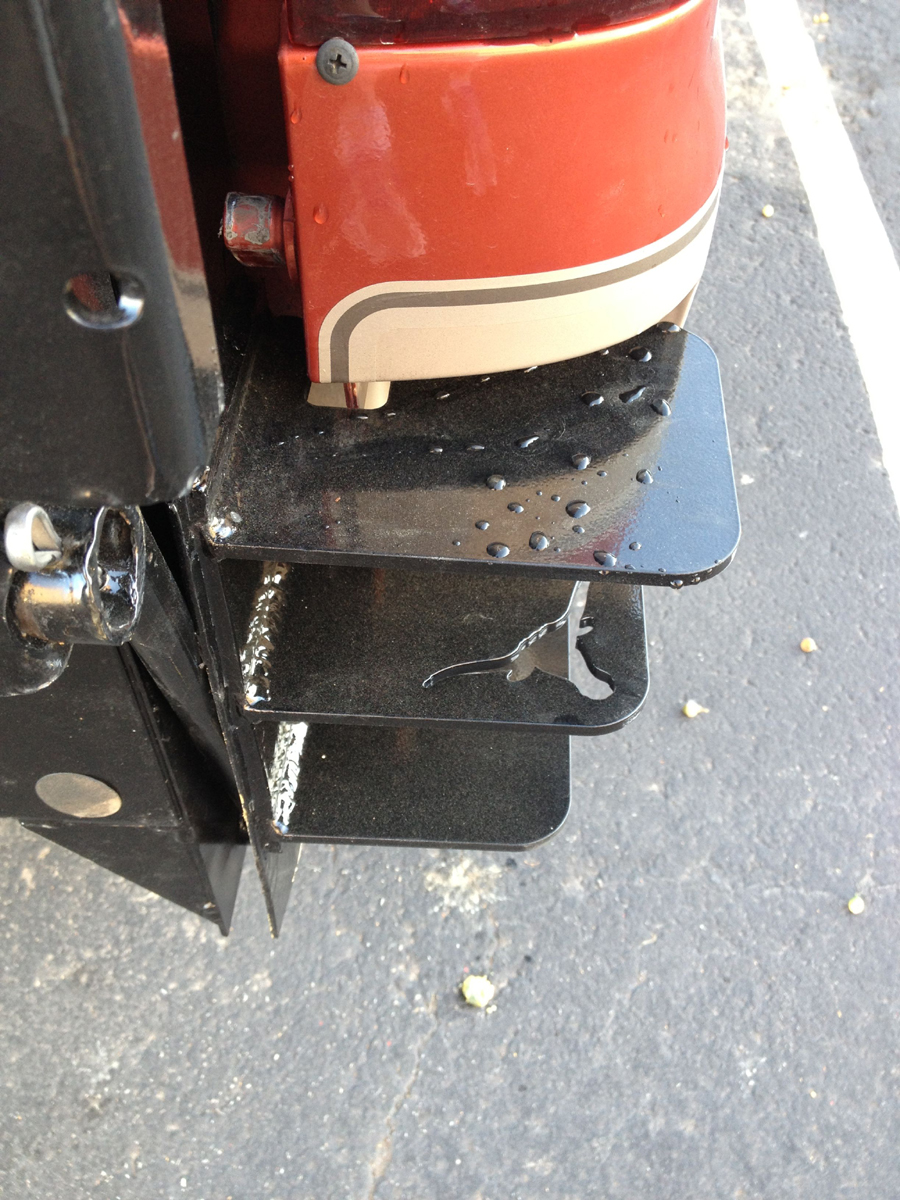
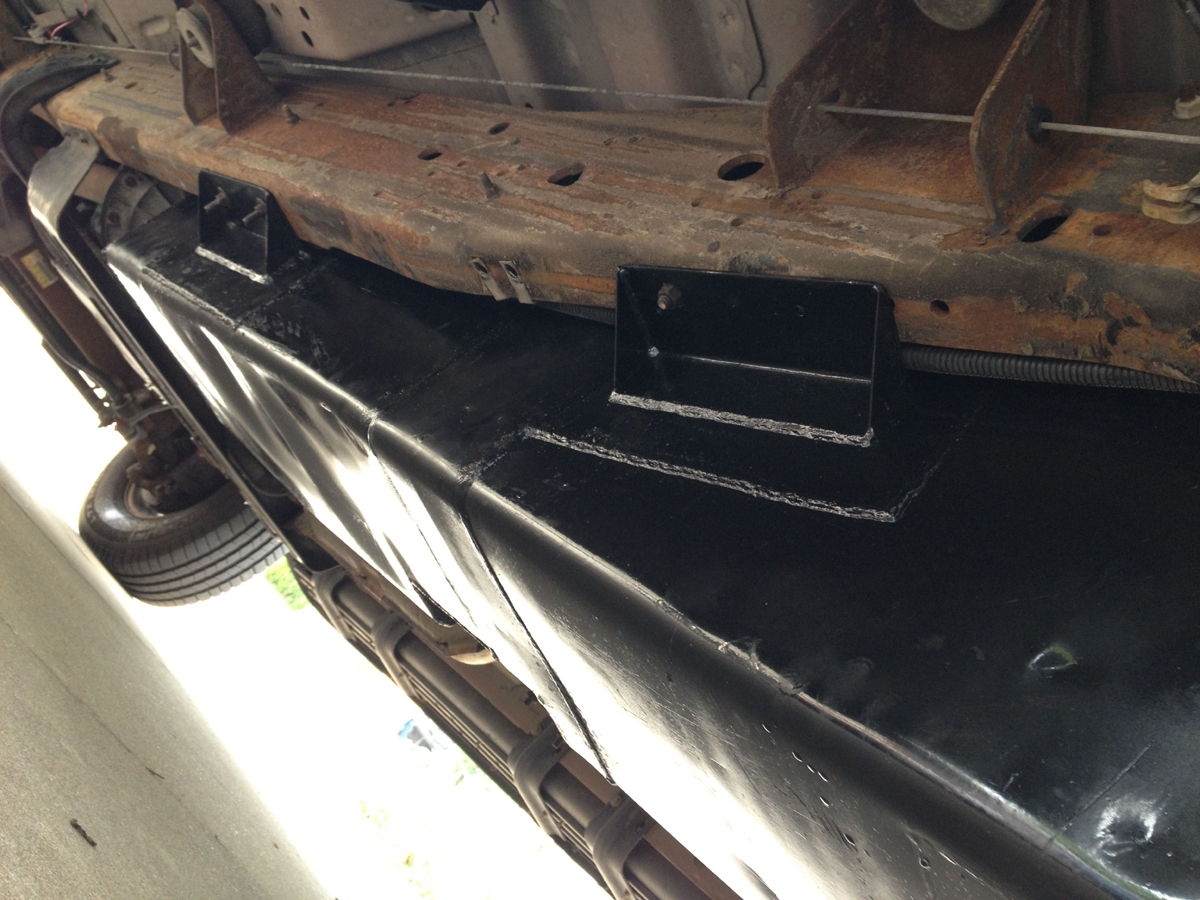
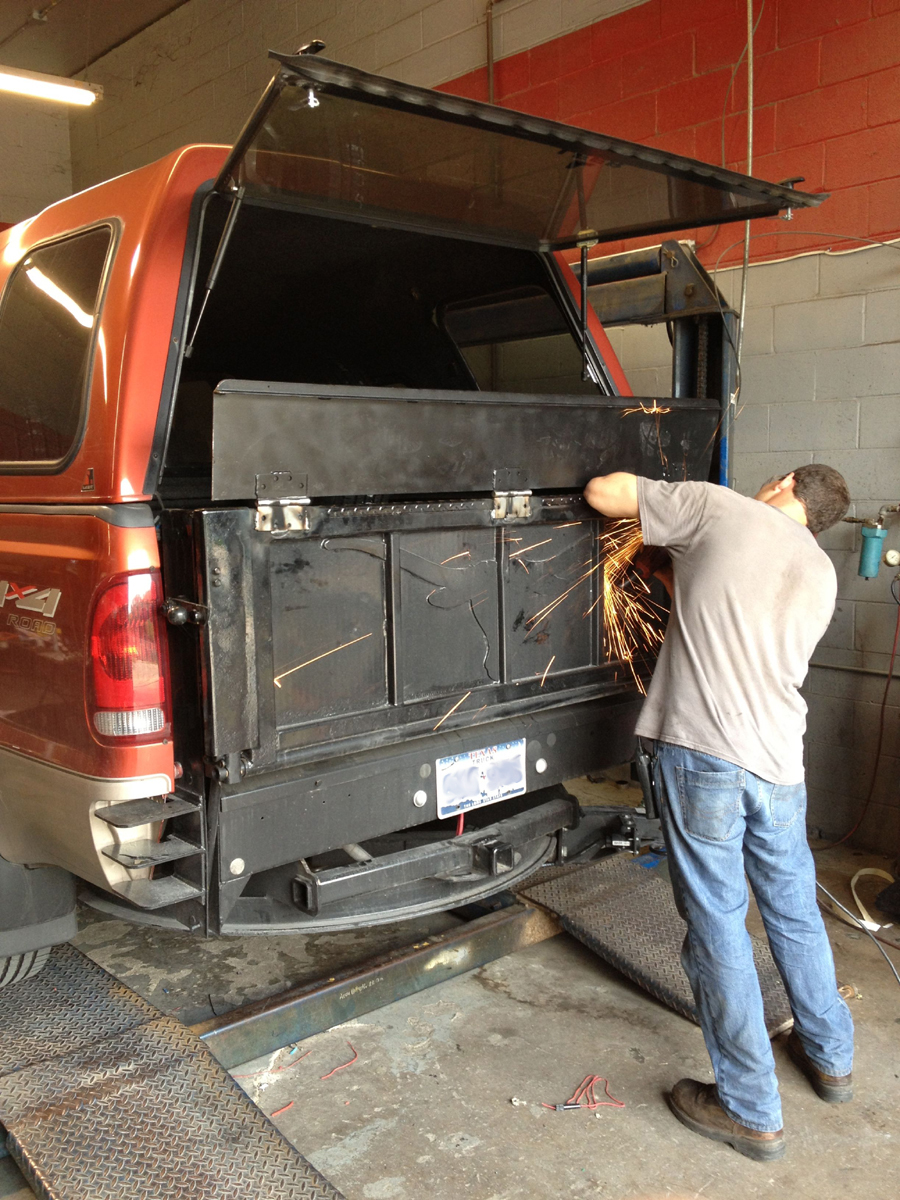
Along with designing the tire mounts, I was also working on a gate flap that would seal in the back of the truck. As I mentioned above in "The Lift Gate!" section, the lift gate sticks out about six inches further than the original tail gate. So my Leer Camper Shell door does not make contact with the lift gate and therefore leaves a 6 x 60 inch gap where rain and dirt can easily get into the back of the truck. With some sheet metal purchased from Metals4U, stainless steel door hinges from Home Depot, and recycling one of the angle iron lengths used as a bed slat in the back of the truck on our 2005 trip, Mike over at Pick Up Heaven was able to weld a flap that fit the gap, hinged close, and with the angle iron made sure that rain water would be drained out away from the truck. I painted this along with the tire mounts and hitch step in the back yard. Mike was able to get the gate flap welded the same day he did the install of the tire mounts.
|
.jpg)
mike welding gate flap
|
.jpg)
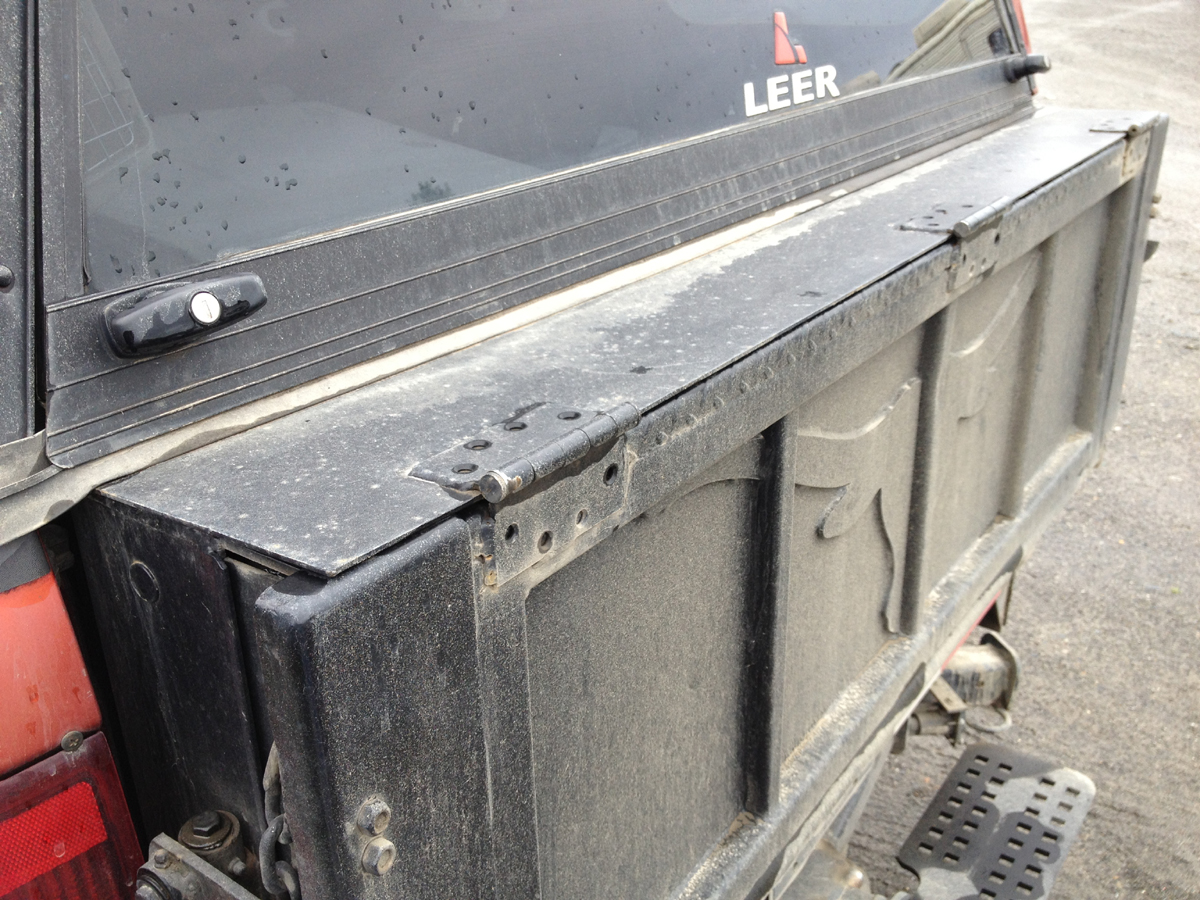
gate flap installed
|
|
|
.jpg)
|
The Pullrite hitch has two receivers. The main receiver is able to swivel 180° and capable of carrying large loads, i.e. our trailer.
|
|
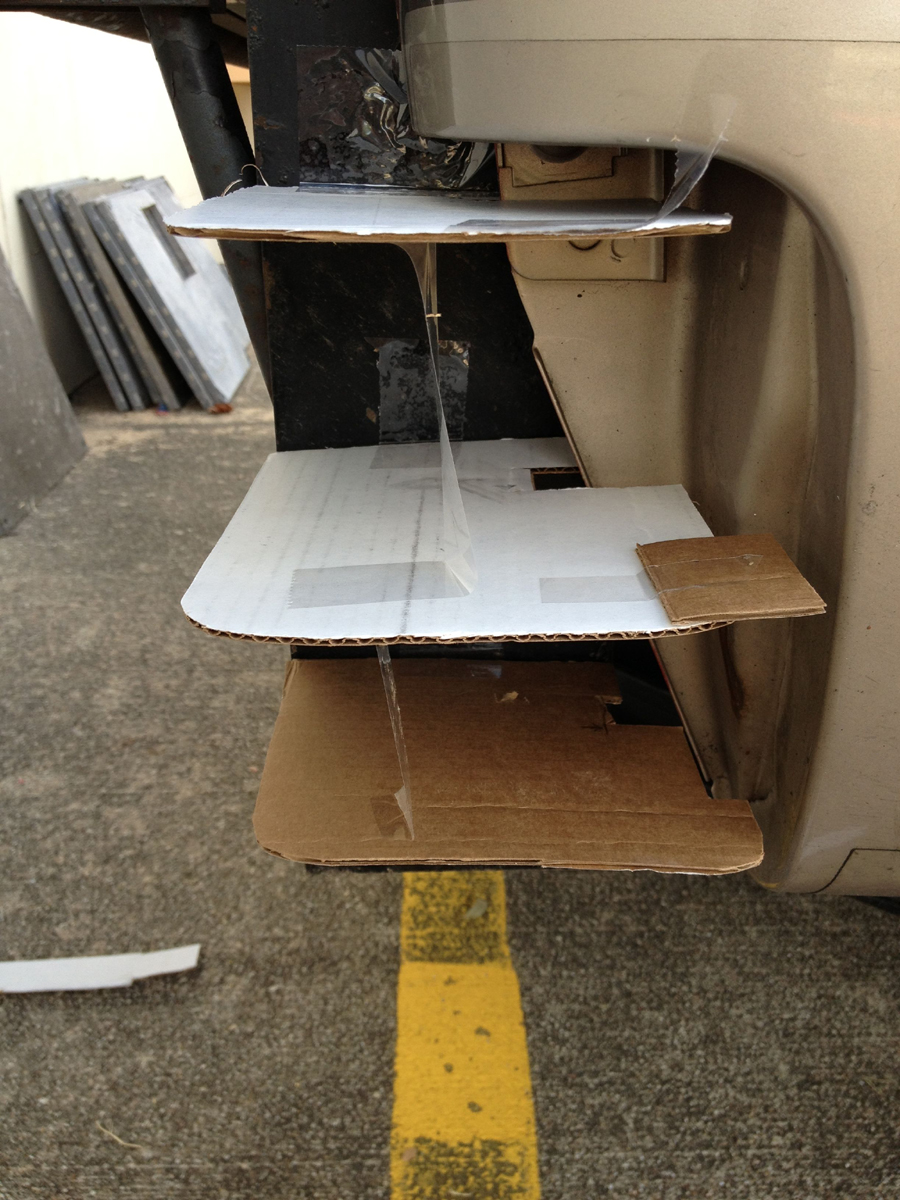
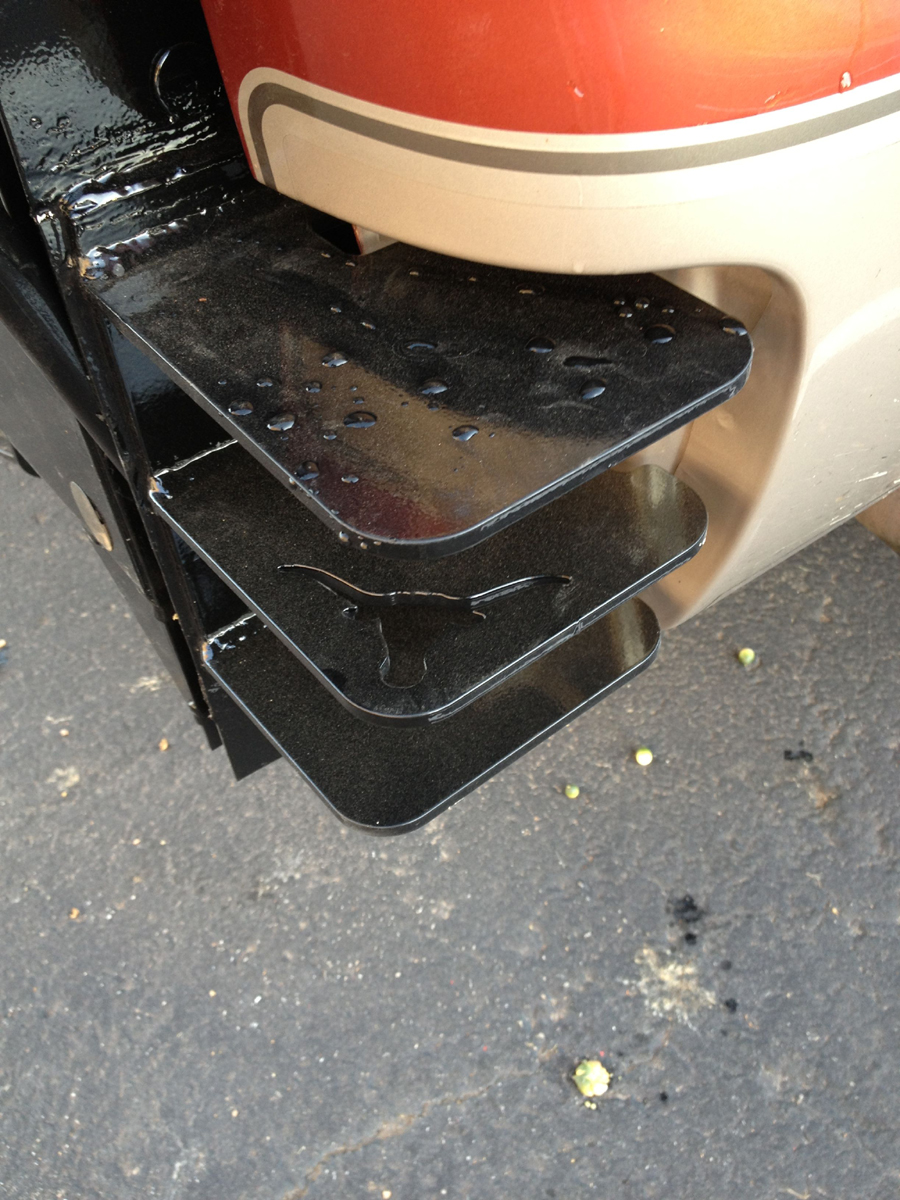
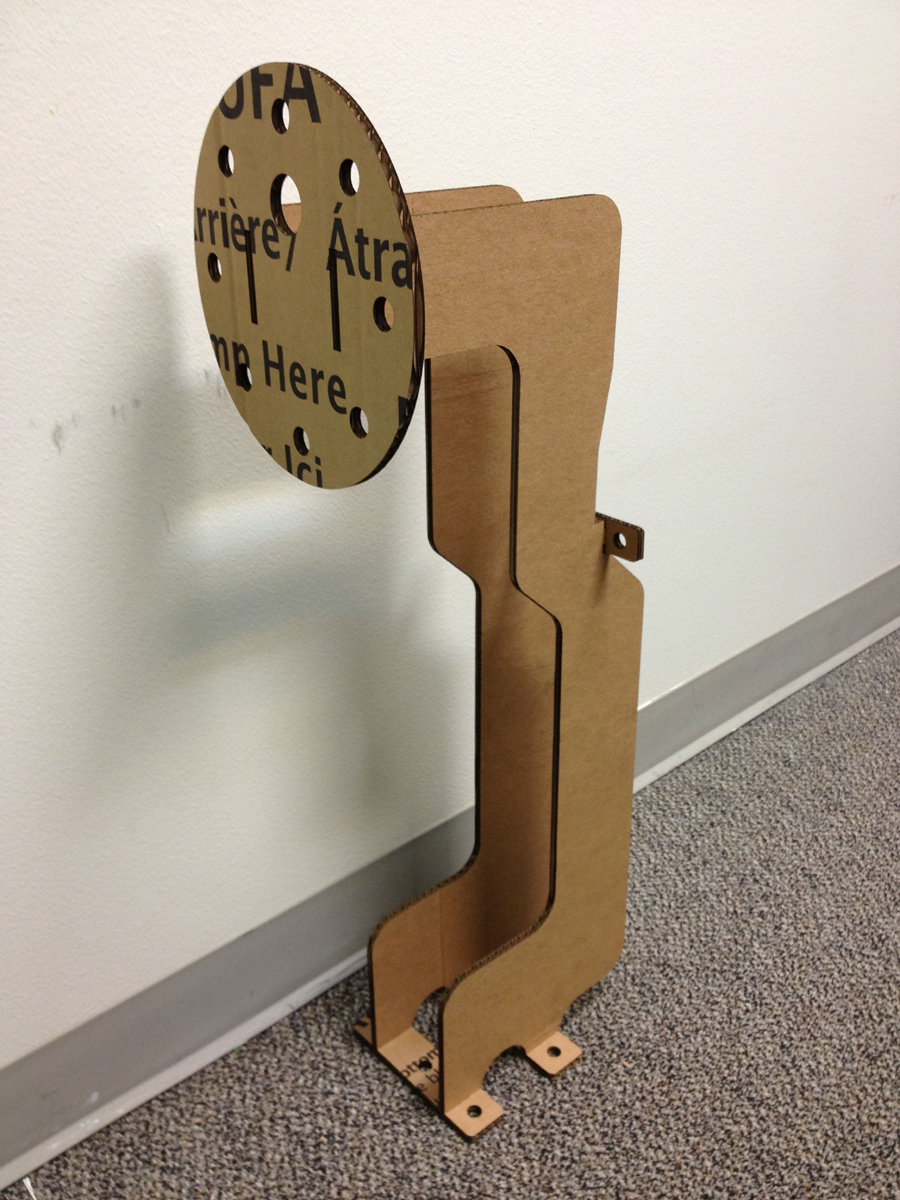
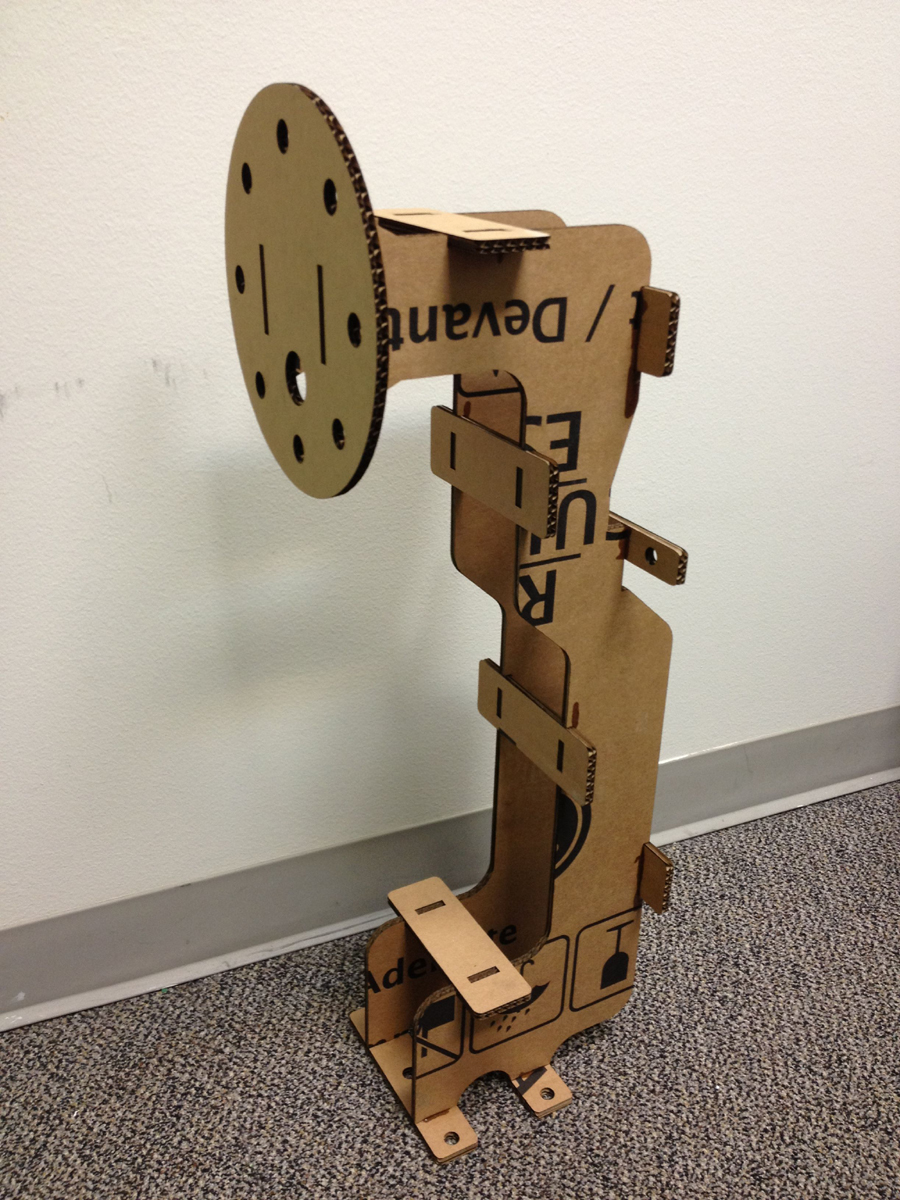
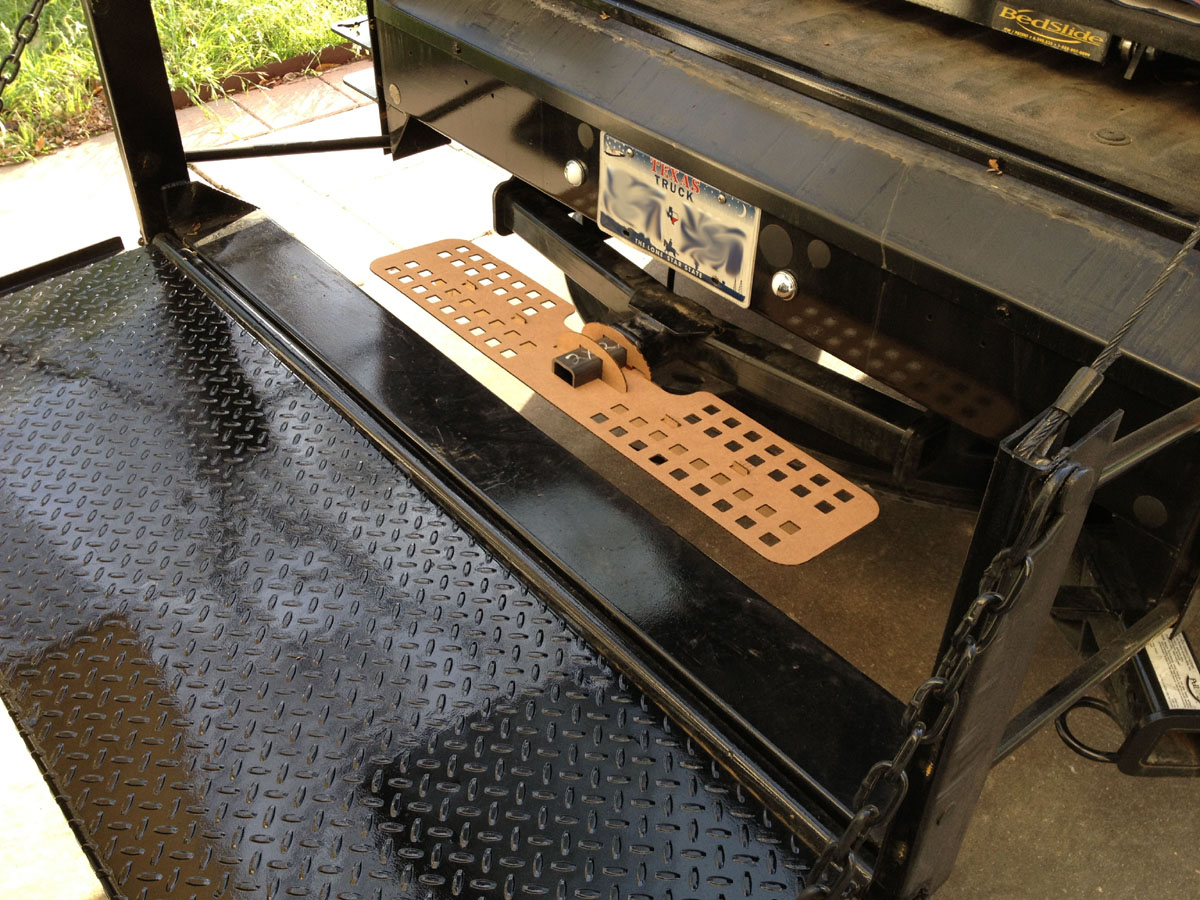
There is also an additional receiver above the larger that allows for standard fixed ball towing with smaller loads. As I would not likely be using this receiver during our trip, I decided to build a custom hitch step that would fit into the receiver, still allow free swinging movement of the receiver below, and allow for complete lift gate operation while installed. I drew up my design in Correl Draw, then had a friend (thanks Ron!) laser cut it out in cardboard to check dimensions. And in a very atypical circumstance, my first design was spot on and did not require an edits. A good friend then water jetted and assemble the parts for me (thank you so much Kevin!).
|
.jpg)
cardboard mock up - main hitch still swings freely
|
.jpg)
cardboard mock up - lift gate still operates as expected
|
.jpg)
painting freshly assembled step
|
.jpg)
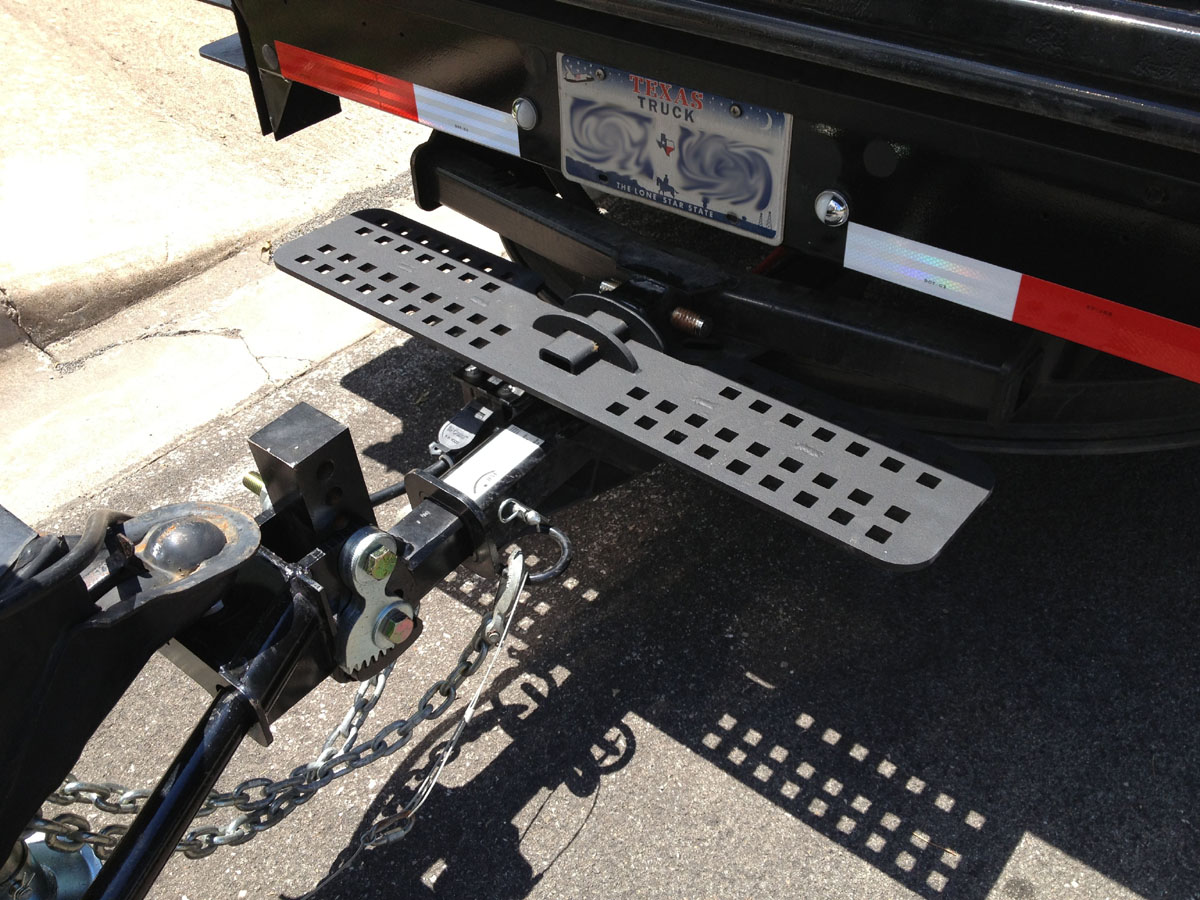
all rigged up with the trailer
|
|
|
I really couldn't be happier with the results of the effort. The tire mounts hold my spares up and out of the way. The Bedslide slides in and out freely even after hundreds of miles of shaking and jostling the contents of the slide. The lift gate works great and looks awesome. The gate flap seals the back of the truck and keeps dirt and water from drenching the bed. And the hitch step let's me have easy access to the back without always having to drop the gate.
|
.jpg)
ready to roll with not a moment to spare
|
|
Last Day of Work
May 9th, 2014
|
|
After being back at VirTex Assembly for 2 years and 3 months, I bid farewell to friends. I will miss everyone a lot. I enjoyed my job and always found pleasure in the work and company of those around me. Many people joked that I would be back again, and perhaps that is a possibility though I think management has had enough of me leaving and coming back. I'll miss lunches with Nick and Jose, special projects with Brad, poking fun at and being poked fun at by Roseann and Irene, talking cars with Chad, discussing photography with Cathy, contemplating lifelong plans and special side projects with Ray, after work chats and random trips to Altex with Russell, stories of redneck neighbors from Daren, playful insults with Long, talking Longhorns with VO, Frank retelling stories of volleyball tournaments past, exchanging expressions of defeat and hopelessness (sarcastically) with Mr. Tam...the list goes on and on. To all my friends: thank you for being exactly who you are. I'll miss you all and hope to see you again soon.
|
.jpg)
goodbye friends
|
.jpg)
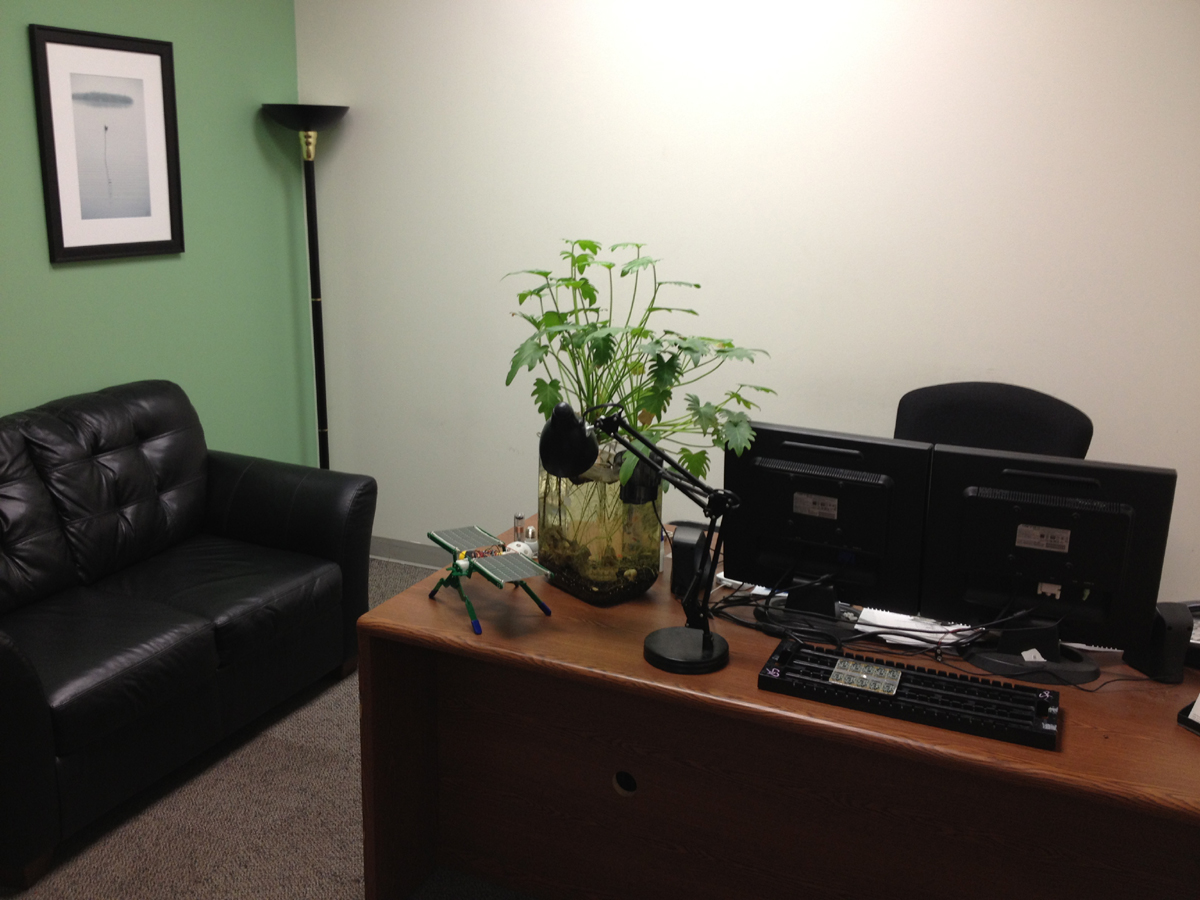
goodbye office
|
|
San Angelo Trip
May 12th, 2014
|
|
I headed to San Angelo to prepare a space in my parent's basement to store all our belongings while we traveled. My parents were incredibly generous and offered up their basement for storage instead of us paying for expensive climate controlled storage in Austin. I was able to rearrange and create a large space that would be suitable. I even brought some shipping crates with me to create an elevated area that would stay dry should there be any water leaks.
|
|
Going Away Party / Z's Birthday Party
May 17th, 2014 (early day)
|
|
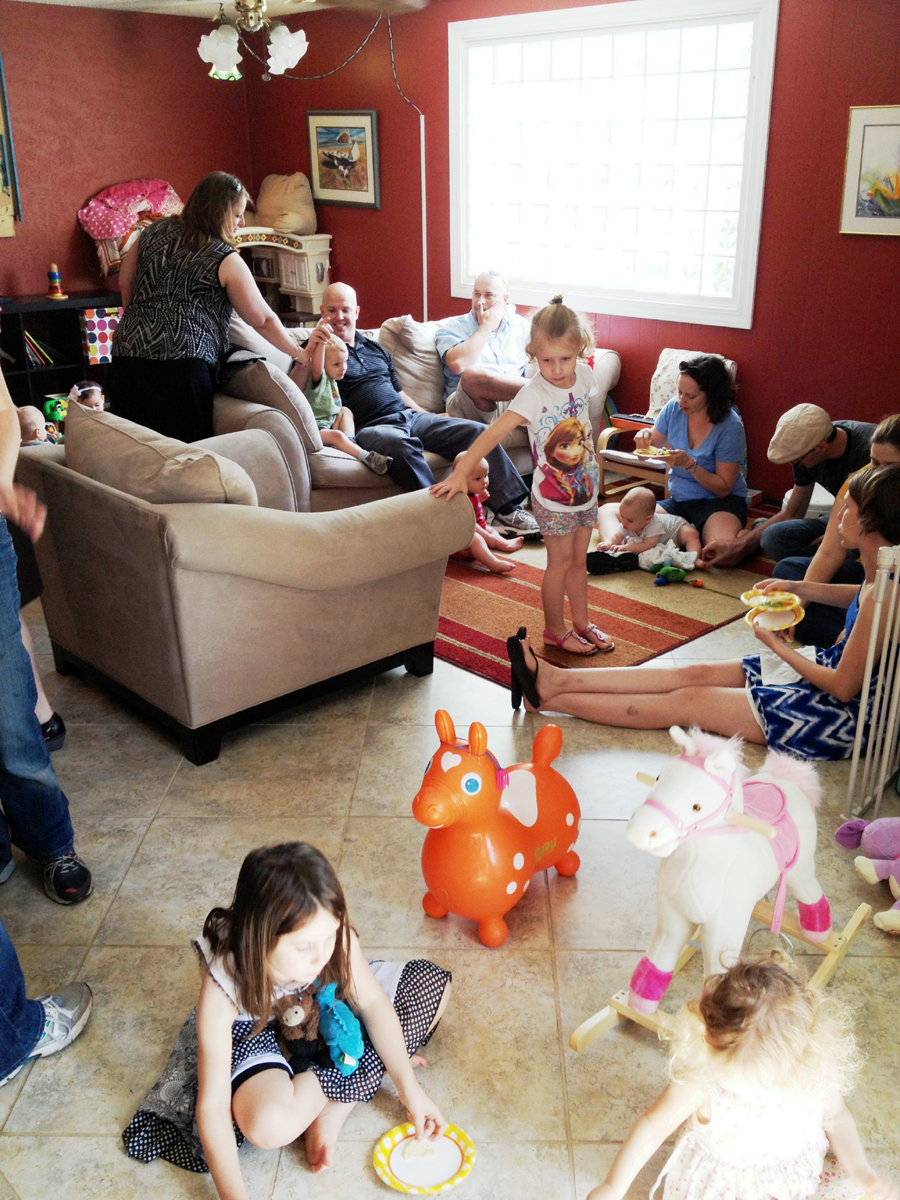
We decided to celebrate Z's third birthday a little late so we could combine the event with an open house/trailer for our friends. We had purple cupcakes with purple monkeys as per Z's request. It was amazing to have so many good friends fill our home and trailer with such happy energy. Z got to show off her room in the trailer to the other kids and her excitement made us hopeful that she would adjust to the new gypsy lifestyle. The whole affair was joyfully chaotic with kids running and screaming everywhere, adults trying desperately to talk above the noise and catch up, and massive amounts of Queso and cupcakes consumed. We already miss our incredible tribe of friends in Austin and the love and support they have given us through the years. Their friendship gives us the confidence to chase our dreams whatever they may be. They also reached out and offered tons of practical support as we got into the final weeks before leaving (ex: offering to bring food and packing supplies and watching Z). We couldn't have done it without them!
|
.jpg)
house full of friends
|
.jpg)
purple monkey cupcakes
|
|
Going Away BBQ
May 17th, 2014 (evening)
|
|
Don, a great friend and an instrumental aide prior to our 2005 Trip, generously threw us a going away barbeque. Don spent hours smoking a brisket and loads of sausage. The event was laid back and just what we needed. At the end, Don even wrapped up the rest of the brisket to take home with us. Thank you again for the amazing gesture and wonderful evening. We truly appreciate your friendship. And, thank you to Don's Mom for offering up her beautiful yard for the shindig.
|
.jpg)
check out that brisket
|
.jpg)
relaxing evening
|
|
Trailer Cat Accouterments
May 19th, 20th, & 22nd, 2014
|
|
There is nothing quite like the smell of dirty cat litter. The smell can penetrate just about any surface and can travel easily throughout any living space. Keeping that smell contained was a HIGH priority if we were going to be taking our two cats along with us. The cats would also need some space of their own so they could hide if needed. Z does like to terrorize them without warning sometimes...we're working on that.
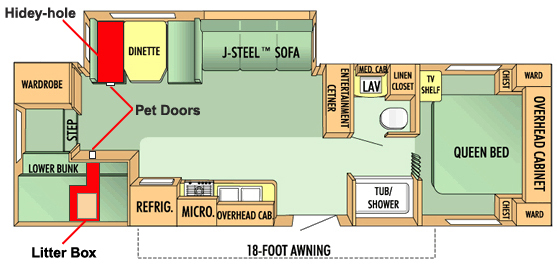
proposed placement for cat hiding spot and litter box
|
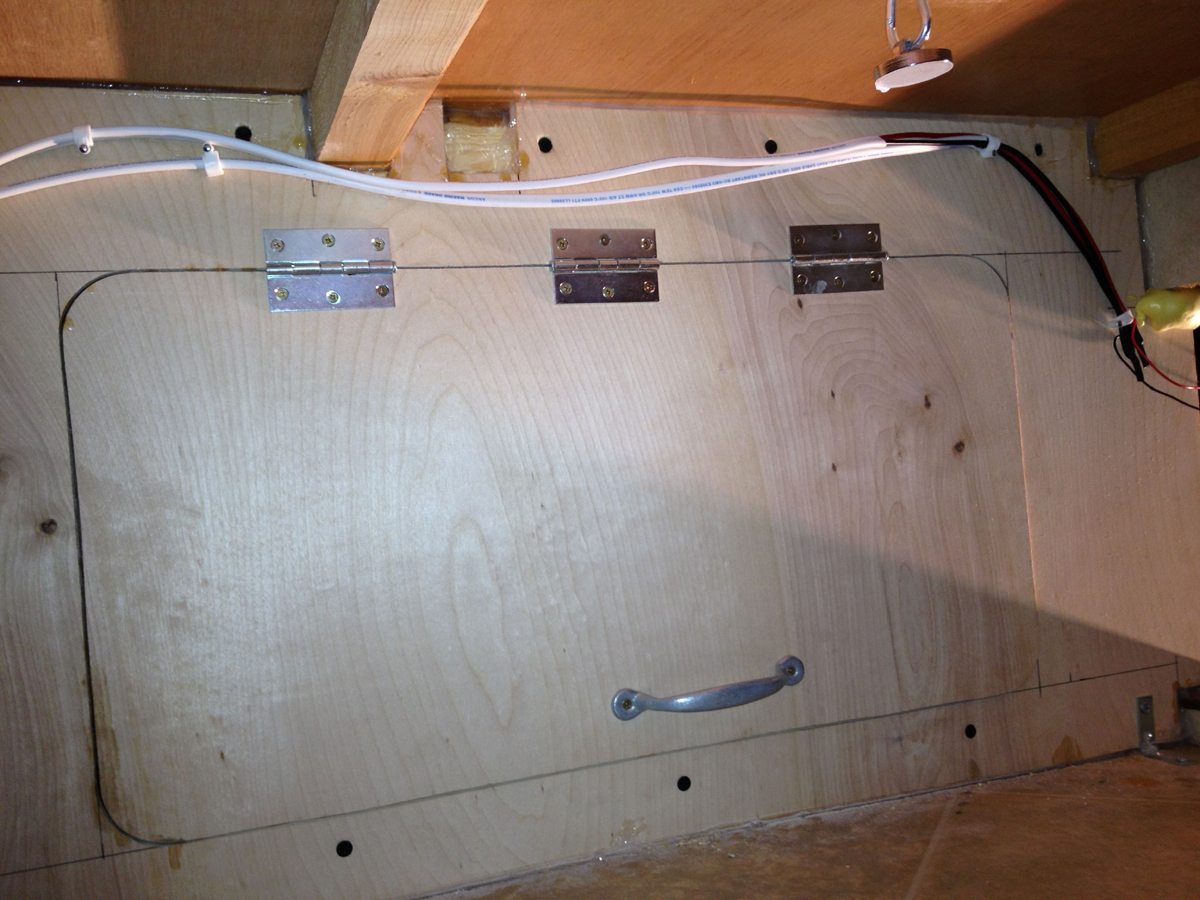
In the trailer, the dinette benches are hollow and have ample storage areas beneath. This would make a great space where the cats could retreat if feeling like they needed to be away from the chaos. I purchased a cat door and Kevin helped me install it. Not so much helped me, more like he installed it himself. He took measurements, drilled holes, used a sawzall to cut out the door, and then installed the cat door. I merely vacuumed up the mess of saw dust when he was done.
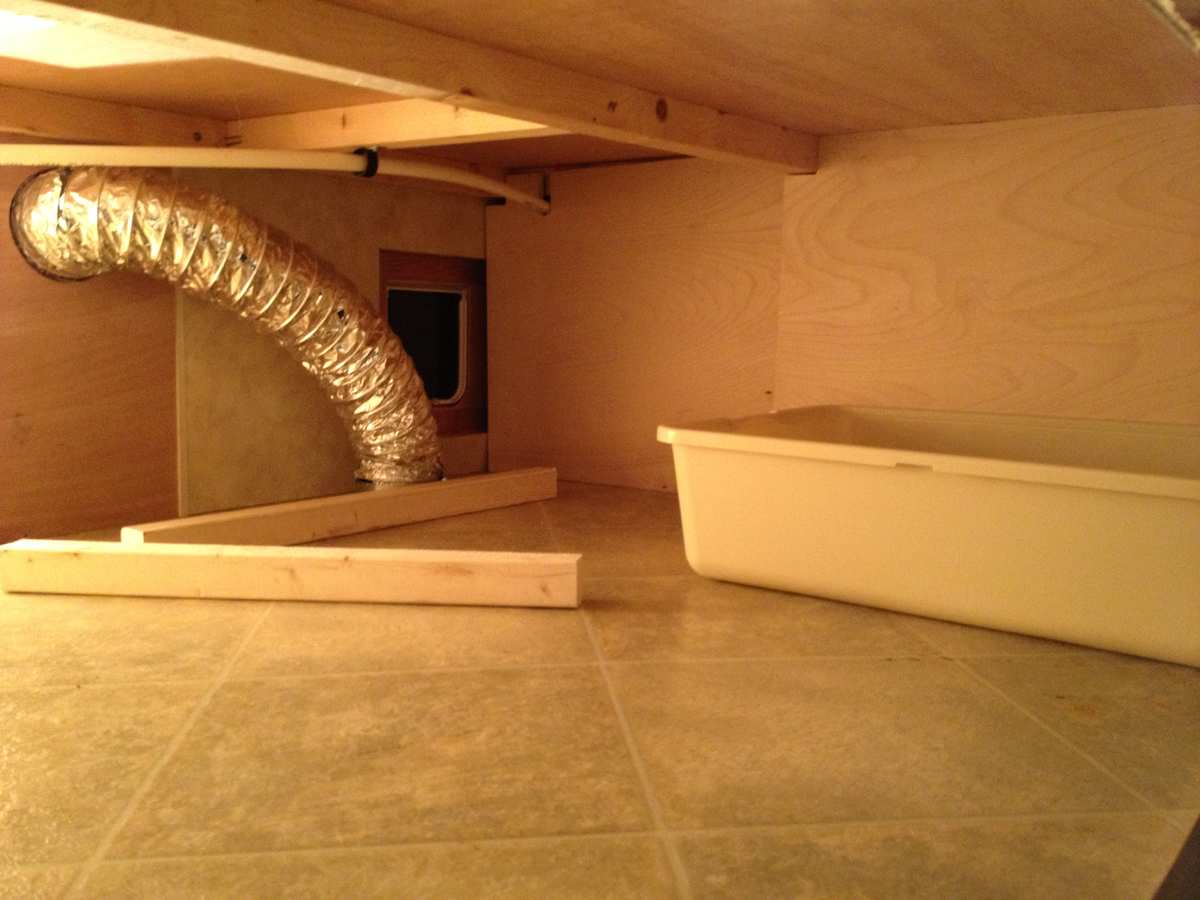
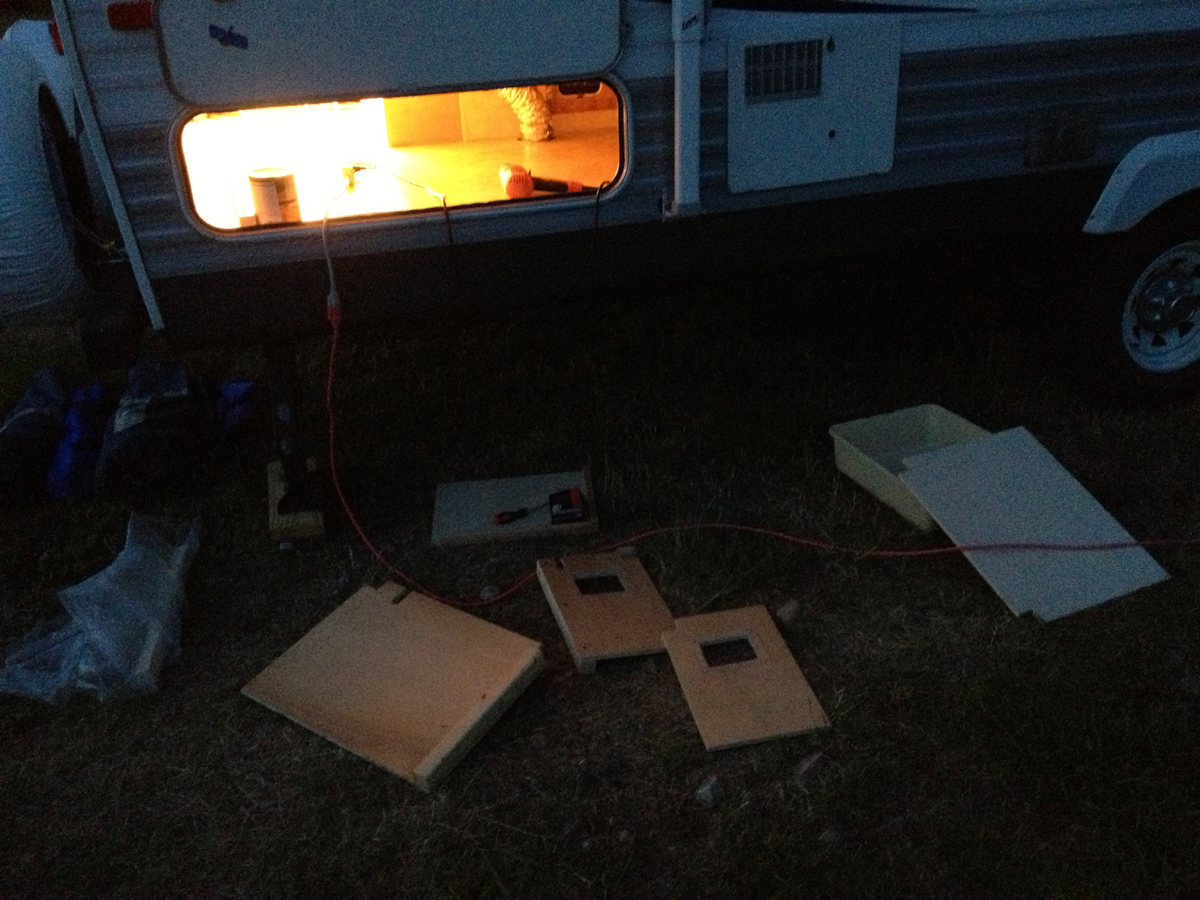
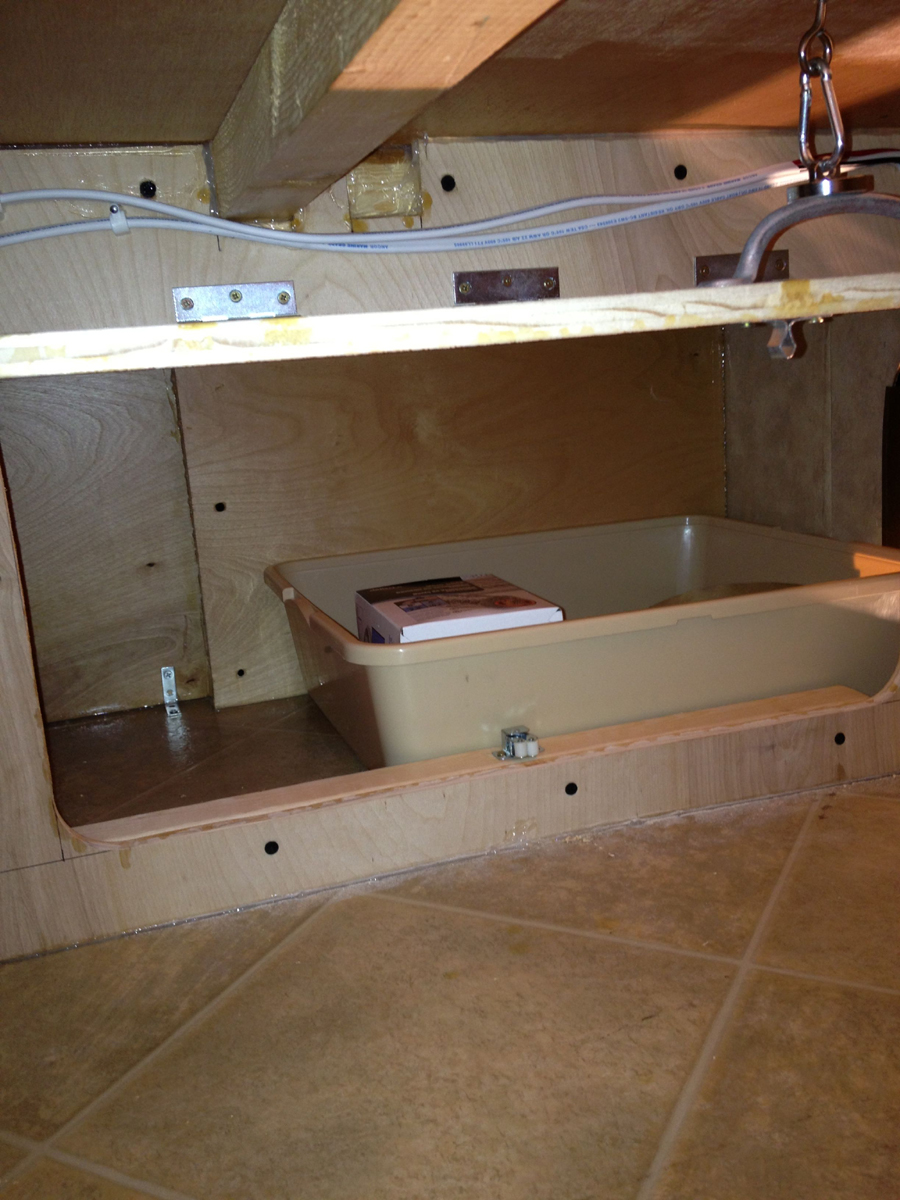
The litter box was going to require a bit more creativity. My requirements for the litter box placement were simple: the cats had to be able to access the litter box from the inside of the trailer through a pet door and I had to be able to access the litter box from the outside of the trailer for cleaning and refilling purposes. Already in the trailer was a small door that opened into a storage area under the bunk beds that was accessible from the outside as well. I wanted the area to be lighted and have an external vent with 12V fan constantly drawing air outside from the litter box compartment. I purchased a cat door, some 12V LED light modules from West Marine, grabbed a 12V fan from the recycling at work, and bought a dryer vent and 4x8' plank of wood from Home Depot.
I prepared and cleaned the area. In those first few moments, I squished myself inside through the external wall's storage door up to my waist. When done doing whatever it was I was doing, I tried to get out. No dice. I was stuck in true Winnie the Pooh fashion. I had compressed my ribs, I guess, to get in and then could not get them back out. Luckily, Kevin was there to help. He helped me pull the rest of my body up inside the storage area. I flipped myself 180° and then I shimmied backwards across the area to the other side where there was a slightly taller opening. I couldn't go out head first so Kevin had to hold my feet and legs straight out as I inch wormed my body backwards until I could get my waist out far enough to put my legs down. Sorry, there are no pics of this event...thankfully.
Kevin took some measurement and was off to cut the first piece of wood to make the containing side walls for the space. This first piece was the keystone and served as anchor and starting point for the rest of the pieces. Over the coming days we cut and built up a space. We then tore it out and I painted the interior of the parts with Polywhey Natural Floor Finish. Polywhey is an amazing finish that brings out the natural color of the wood, dries hard as a rock, and has no VOCs and therefore has zero off gassing. We were going to use this to finish the floor in the Airstream, but that didn't happen so now it helps keep odors out of our Jayco. We then reassembled the pieces one by one all the while using pure silicone to seal any edges and borders that might allow air to pass. Now it was time to cut a hole in the storage door to fit the dryer vent with 12V fan. Finally, I wired the 12V lights and fan up to the water pump, which could be switched on inside the trailer at the main panel, and we were finished.
.jpg)
roughing things out
|
.jpg)
ready for install
|
.jpg)
litter box sealed off
|
.jpg)
access door open and litter box easily reached
|
The litter box works great! The cats have no trouble at all getting into the area. And even without running the fan, smells stay contained and are not noticeable inside the trailer. A few guests have even commented on the total lack of odor. Furthermore, I can easily retrieve the litter box from the outside so as not to make a big mess inside every time it needs cleaning.
Kevin was absolutely instrumental in making the cat litter box project and hidey-hole area come to fruition. I cannot thank you enough for all the help. I only hope to repay the debt someday when you need some help.
|
|
Cacophony of Moving
|
|
We had got it in our heads that we would leave Austin Friday May 23rd, a week earlier than anticipated. We had already said our goodbyes to friends, and we had a hard date to visit Nicole's sister and her family (including a new niece) in Las Vegas and then to meet my folks and sister's family in Yellowstone. So, if we left a week earlier, we would have another week to settle into travel before having to meet up with others. Sounds good, right? We were stupid.
Nicole was amazing. She handled way more than her fair share while somehow balancing watching after Z. She went without sleep late into the early morning hours over and over making sure that our belongings were packed for any handling. I really don't know how she did it all. I was supposed to pack up my office and that task was overwhelming enough, but she somehow handled the rest of the house. In the days leading up to Friday, we were burning the candle at both ends and had even, brazenly, packed up all of our dishes and given away the food in our fridge, freezer, and pantry anticipating our departure. Also, we weren't just packing, we were sorting everything into four piles: save for the trailer, pack in a box to keep, donate, or trash. Though we did have help from friends that watched Z so we could pack more easily (many thanks to Ronda, Sarah, and Leo), the task was still daunting.
Nonetheless, we had a "schedule" to keep so we went Friday to pick up our U-haul. Our friend, Ronda, generously watched Z most of the day so we could pack without distraction. Movers were scheduled for the next day. When we arrived at the U-Haul facility (just a mom and pop storage place that happens to rent trucks), there was no one there despite the fact that the lights were on, the hours posted on the door indicated that they should be open, other people were waiting for their trucks as well, AND they themselves had scheduled our pickup time. We were not happy campers. However, while there, I was able to see the truck we were to pick up and realized it would not be big enough for all of our stuff. After waiting about 20 minutes, I called U-Haul corporate and explained the situation. The nice girl was awesome, canceled my reservation, and re-reserved another truck at a true U-Haul facility just a few miles away. I also took the chance to upgrade the size of the truck. It was fortunate that they were not there; otherwise, we would have taken the truck and NEVER been able to fit our stuff.
Saturday, May 24th
At 4am, after a frantic packing push, I called the movers and left a message not to come that there was NO way at all we would be ready in the least. We went to bed and when we woke up around 10am, luckily I had a message waiting from the movers saying all was OK and that they weren't coming. We evaluated our options for moving and decided that we would try to leave Austin on Tuesday the 27th as Monday was Memorial Day. I called U-Haul and explained our predicament. The manager told me to bring the truck in, charged me only for the one day we had the truck, and then pushed the reservation out for a Monday pickup without penalties. We relaxed a bit our efforts, grabbed a lunch out, and got back to packing - for the rest of the day.
Sunday, May 25th
More packing...all day...few breaks. I filled the back of the truck twice almost to the top of the camper with items to donate. I also called several friends to come take things they might want/be able to use. We had already made numerous donation runs in the weeks prior as well! Who knew we had so much stuff?
Monday, May 26th
At noon, we picked up the U-Haul truck. The day was, again, mostly packing. We had dinner out and then went right back to it.
Tuesday, May 27th
Since we had to rebook movers for Tuesday, we had been hard pressed to find anyone to help with such short notice. The movers we finally did find had another big job on Tuesday but promised they would come over as soon as they could. They arrived at 1:30pm and we worked until 4pm. They were awesome. At 5pm, I left for San Angelo. The house was mostly cleared out aside from Z's mattress, a futon pillow for Nicole to sleep on, and other miscellaneous items we couldn't fit in the truck or UHaul. Nicole and Z stayed behind, went to dinner, and then spent the night at the house.
.jpg)
|
While driving through Burnet County, my phone popped up this lovely gem. I had seen alerts like this before but none that said "Take shelter now." The skies proceeded to open up and poured buckets. I could hardly see at times. The rain passed in about 20 minutes, but the alert, rain, and fact I was driving a gigantic truck with all our belongings really didn't help the nerves at all.
|
I arrived in San Angelo around 9pm, parked the truck in my parent's driveway, ate a wonderful dinner my mom had made, and went to bed.
Wednesday, May 28th
Around 9am the movers showed up and we began shuffling belongings into the basement. Surprisingly, all the boxes did indeed fit and there was even some room to spare. The truck was still half full with our furniture and appliances. These things we took to another storage site. We were wrapped up by about 1pm. I hopped back in the U-haul truck and then drove it back to Austin, arriving around 5pm. Nicole and Z picked me up and we went to Maudie's for dinner as we didn't have much food, or any dishes, in the house anymore. That night I drove out to Haley and Kevin's where the trailer had been parked while we worked out a cat litter box solution. I stayed the night so I could get up early the next day and bring the trailer back to our now almost empty house.
Thursday, May 29th
I got up early and started working on installing the conspicuity tape all around the trailer. After having the issue that very first night of towing it where the running lights didn't work, I wanted the trailer to light up at night at any angle just from another's headlights. Thank you 3M. Our trailer is impossible to miss.
I hitched the trailer and drove it back to our house. The rest of the day was spent packing and sorting and running some final errands in Austin.
Friday, May 30th
Nicole ran some much needed errands in Austin for part of the day and I worked on packing the truck and trailer with the final remaining belongings. The truck was packed to the gills, front seat, back seat, and bed. Nicole's car was stuffed full as well and I even had to throw some stuff in the trailer.
We each walked the house one last time and said our goodbyes to the house where our daughter was born. Those walls had been witness to some good stuff through the years and we were sad to leave.
.jpg)
shadow in the foreground is our new home
|
We left for San Angelo around 6pm, Z and our two cats in Nicole's car, and me in the truck pulling our new home. We got in after 10pm, tired and worn out. My mom, once again, came through with an awesome dinner. We filled our bellies and then waddled off to bed. We left the cats in the trailer for the night. This was their first night in the trailer.
Saturday, May 31st
In the morning, with the help of my dad, we unloaded the truck, trailer, and car and stored the remainder of our belonging in the basement. That little bit of room I said we had left after unloading the U-haul was consumed and then some.
When I checked on the cats, I found them in the storage compartment in the cat litter box. I guess this was probably the only part of the trailer that was familiar.
I then pulled the trailer over to the KOA out on Lake Nasworthy. The sites were wonderful pull through sites. Nicole excitedly stayed at the trailer to organize our new home while Z and I went back to my folk's place. Later on, we all met my mom at Henry's (still my favorite Mexican restaurant in San Angelo) for dinner. Then, back the trailer for showers and bed.
.jpg)
parked at the KOA in San Angelo
|
Sunday, June 1st
We drove over to my parent's house for breakfast. Again, thanks mom for the sole nourishing meals throughout this ordeal. Nicole and I decided we would leave today. The plan was for Nicole and Z to stay at my parent's house so as to give me ample time to hitch and prepare the trailer. However, on my way over to the KOA to pick up the trailer, the service engine soon light came on. After all the stress we had been through already just to get to this point, I freaked the hell out. What was wrong now?!? We had already dropped over $10k to get the truck ready. Would this be horrible? Would it stop us? Would it cost us more savings? It would certainly cost us more of our savings, but how much? How long would it take to fix? Would the Ford dealership in San Angelo give a rip about our timeline? Could they even get to us quickly and would they rip us off once they did? The dealership was closed on Sunday so I would have to wait...
After I stopped freaking out, I drove over to Autozone, purchased a code reading computer, and then texted my mechanic in Austin with the error codes. "Exhaust Gas Recirculation Flow Insufficient Detected" is what the error code read. He suggested it was something simple like a faulty DPFE sensor.
.jpg)
service engine soon light - ye haw
|
.jpg)
why does it have to re-circulate anyway
|
Monday, June 2nd
I was the first person waiting by the service entrance door at 6:45am, just before the shop opened at 7am. The staff was friendly and courteous. They explained that it was a Monday and that many people had appointments but that they would work me in as quickly as possible. I sat in the waiting room patiently. By about 9:30am, I had a diagnosis: faulty DPFE sensor. They were already replacing and the truck should be ready shortly. $360 later, I drove back to the trailer at the KOA. Before hitting the road, we decided to run a few more errands including getting a haircut. In passing, I had mentioned wanting a haircut, and my mom generously got appointments for all of us with her stylist John who also cut my hair when I was growing up in San Angelo. I got a trim, Z got her first haircut, and Nicole, perhaps as a testament to the transition we were having, decided to chop all of her hair off. After the shock of seeing her hair above her ears wore off, luckily, I still found her every bit as beautiful.
After getting sidetracked with our haircuts and errands, we realized the day was slipping away from us, and we needed to get on the road. Sure, there were more errands to run and San Angelo is very nice. We could have easily stayed for several more days and taken our time. However, I felt like we needed to go. NOW! I was not in a great place after all the stress of leaving Austin and the thought of delaying yet again was causing me more stress. Even though it would put us in late at the Balmorhea, we decided to hit the road.
We left around 6pm. The drive out to Balmorhea took about 6 hours with some stops along the way for bathroom breaks and dinner. We arrived around midnight. I set up the trailer and we hit the hay. Years of planning and saving had all come together and we were finally on our way.
|
|